EXISTING SKU creation for EXISTING export market while the task status of linked Prime must be Cancelled / Completed-Approved / Completed-Conditionally Approved for regulatory tasks and Completed / Completed Pending / Complete-Conditional Approved / Completed-Fail / Cancelled for QC market tasks.
💡
Attentions:
The trigger logic is updated by using the country code to determine which export market should be triggered, regardless of the DC code. If the DC provided in the Monday feed is not on the designated DC list, the import will be rejected.
Regulatory (Export Market)
DC List
Country Code List
US
89/95/97/98/99/982
1
EU
89/95/97/98/99/982
2
UK
89/95/97/98/99/982
GBR
Global
89/95/97/98/99/982
GLB
Quality test level will be created depends on the value on QC column:
Quality
QC
Trigger QC task
Y
Not trigger QC task
N
For Regulatory test, tasks will be triggered when specific country code and either one supported DC list input in Monday feed, while task status of the existing export market is Cancelled / Completed-Approved / Completed-Conditional Approved.
For QC market, it allows users to create an additional QC task when the task status is Completed / Completed Pending / Complete-Conditional Approved / Completed-Fail / Cancelled
Select the SKU of different export markets for grouping
Select Actions>Create Prime SKU Grouping (AFLP) or Actions>Create QC Grouping
Fill in Test Matrix
Select Prime SKU
Build Prime-PIM relationship at test level
💡
Grouping Logic of New SKU:
Same Vendor
Same Test Nature (Regulatory or Quality)
💡
Criteria to group with an existing Prime SKU:
Same Vendor
Same Test Nature (Regulatory or Quality)
The export market involved must have tasks within the validity date or have an outstanding task.
💡
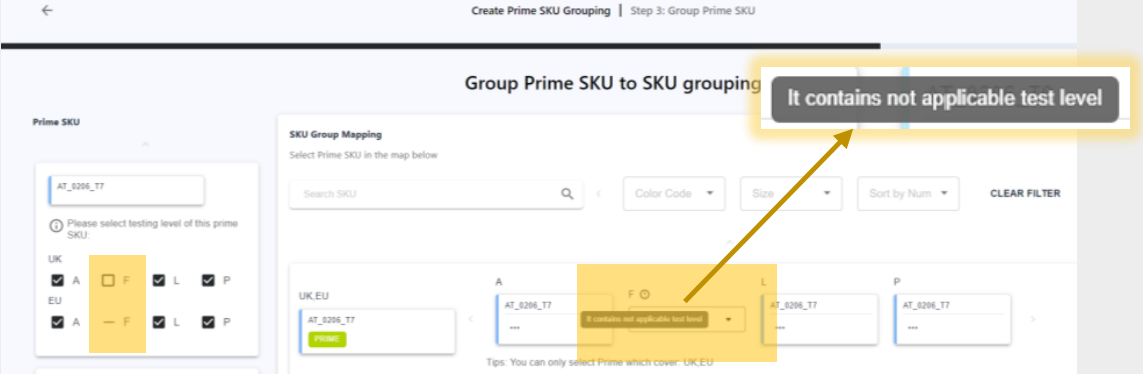
Notes for multiple market grouping:
To group the new SKU to existing Prime SKU, it’s crucial that the involved export market and test level of the new SKU are encompassed by the existing Prime SKU.
Indicate It contains not applicable test level when test level is not applicable for some of the involved export markets per assigned test matrix. Assign Prime/PIM is required for applicable export market.
Quotation tab is visible only if vendor requests for Quote from Lab and Quote(s) is available. Quotation tab is invisible if vendor skips quote, or status is still Waiting for Lab Quote.
How do I view TRF (Test Request Form)?
To view the TRF submitted by Vendor:
Task List page
Select a specific task from Task List page and view submitted Test Request Form (TRF) in Task>Task Information.
Select a specific SKU from ALL SKU page. Go to Task>SKU Grouping, click on the hyperlink in Submission No, and view submitted Test Request Form (TRF) in Task>Task Information.
TRF can only be downloaded and viewed after Quote Confirmed.
How do I keep track of activities and changes of SKU/Task?
Log features enable you to keep track of activities and changes made on the platform (since 11 Apr 2023):
Update Log time zone from UTC to PT time.
SKU Log (visible to RH and Vendor)
Select a specific SKU from the All SKU page
Go to Log tab to view the activities and changes made
💡
The Log records the actions in chronological order performed by users, such as task(s) creation/deletion, changes of SKU details including SKU information, SKU images and other SKU supporting documents.
Go to Task Log tab to view the activities and changes made
💡
The Task Log records the actions in chronological order performed by users for a specific test task of an export market, such as SKU relationship, status changes from Task Pending to Completed or Completed-Fail, approval status changes, trigger of re-test and its related changes.
Go to Log tab to view the activities and changes made
💡
The Log records the actions in chronological order performed by users for an individual test task, such as status changes from SKU acknowledgement to Completed or Completed-Fail, lab changes, report and result changes, information changes including factory details, billing details.
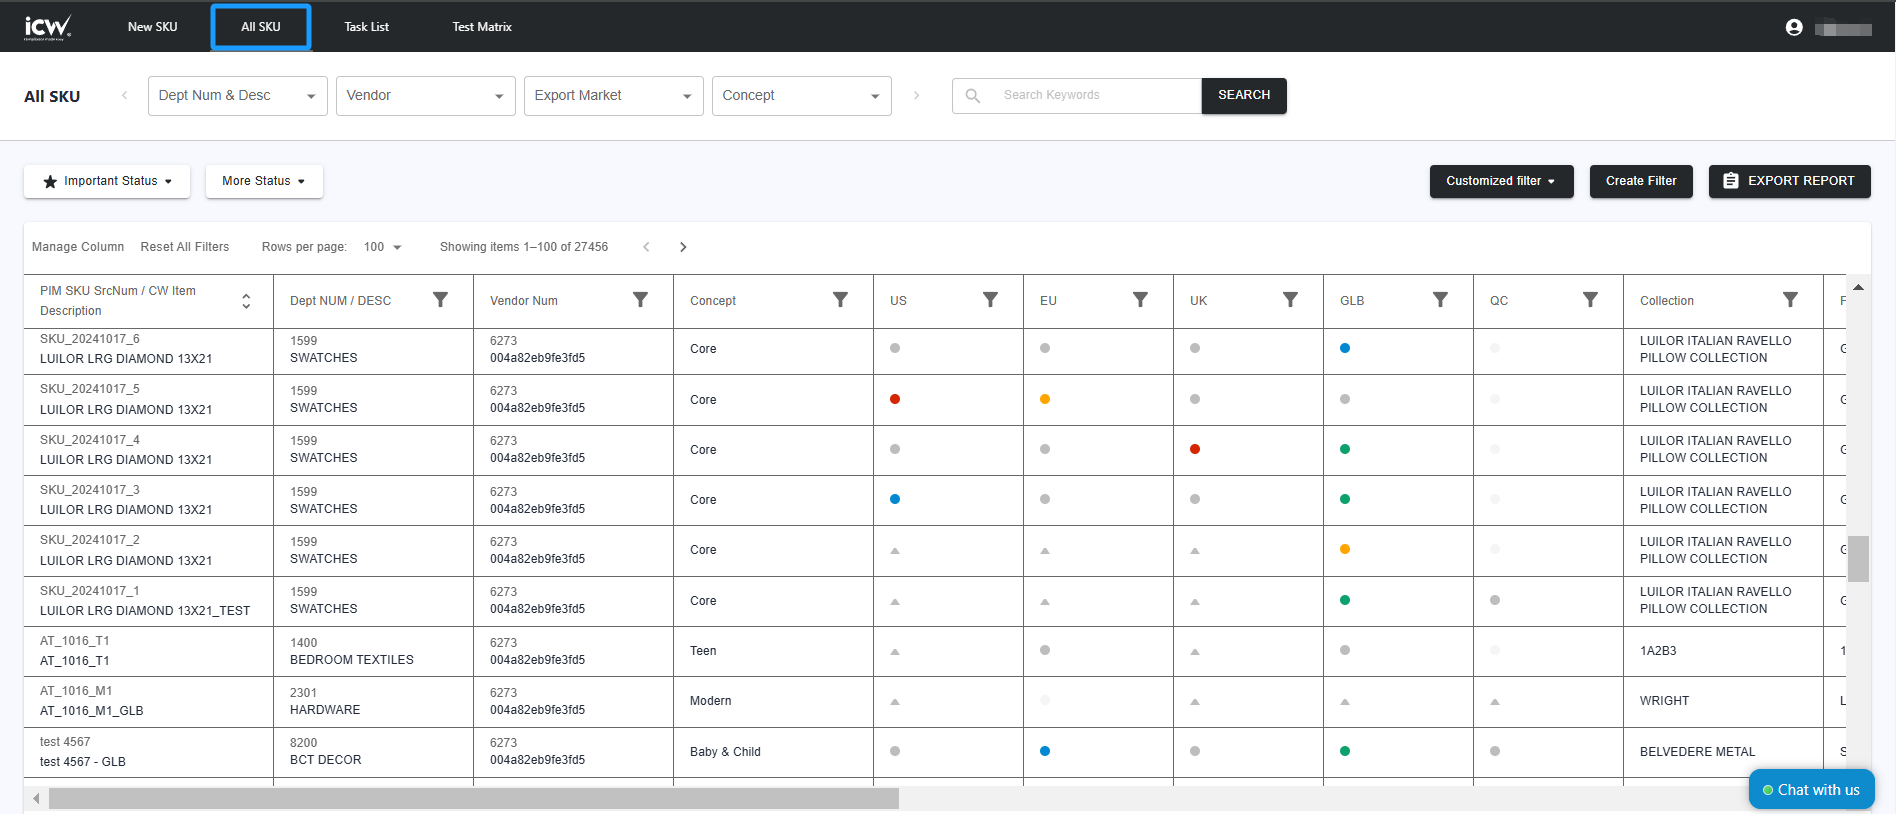
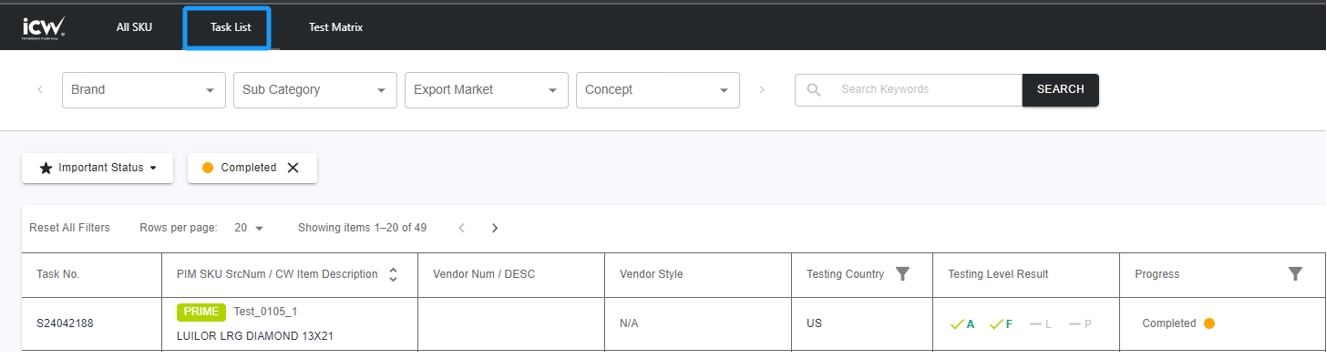
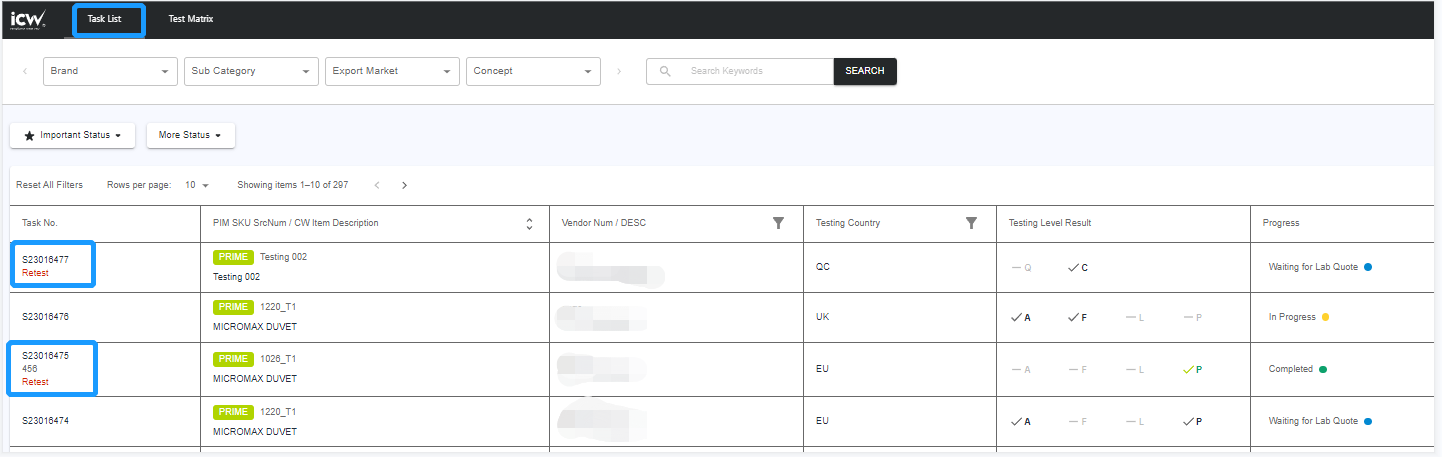
View the overall SKU status by traffic light on All SKU page
🖼️
💡
Overall task status for regulatory tests of each export market and quality tests are based on the priority of each task status for the involved test tasks.
For Full Prime SKU, the overall status is determined by considering the priority of each task associated with the Full Prime SKU.
For Half Prime SKU, the overall status is determined based on the priority of each task before approval. After approval, the status is either "Completed-Pending" if the linked Prime SKU is not approved, or it reflects the overall approval status if the linked Prime SKU is approved.
For PIM SKU, the overall status is determined by considering the linked SKU's status, based on the priority of each task.
View the overall SKU status for specific SKU
Select a specific SKU from ALL SKU page and view traffic light per export market in Task.
The earliest report issue date (input by Lab when uploading the report)
To view the Validity Period for specific SKU, select a task from ALL SKU/Task List page, View Approval Details next to Reports in Report & Result, and view Validity Period.
Validity Date is the overall SKU validity for an export market which is determined by the earliest overall validity date among the connected PRIME SKUs.
Task’s Overall Validity Date (in each export market)
To view the Validity Date for a specific SKU, select a SKU from ALL SKU page and view Validity Date per export market in Task.
For regulatory task , if the latest task is not Complete - Approved or Complete - Conditional Approved, the validity date will show as N/A with indication: “The task isoutstanding, validity date unknown”
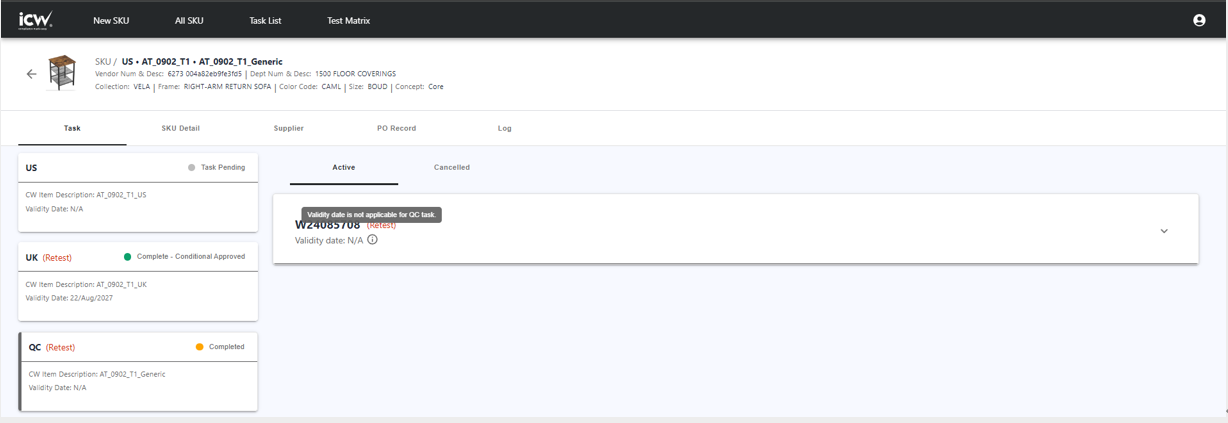
For QC task, the Validity date will show as N/A with indication: “Validity date is not applicable for QC task”.
💡
Note:
No matter the SKU is FULL PRIME, FULL PIM or HALF PRIME/ HALF PIM, the overall Validity Date is determined by the earliest overall validity date among the connected PRIME SKUs for that task (W) no.
The Validity Date is available when the overall task status is approved or conditionally approved.
The Validity Period is available when the task is approved or conditionally approved.
The renewal logic, Validity Date and Validity Period are applicable for Regulatory only (US, EU, UK,GLB), not applicable for QC tasks.
✸ Approving Test Report
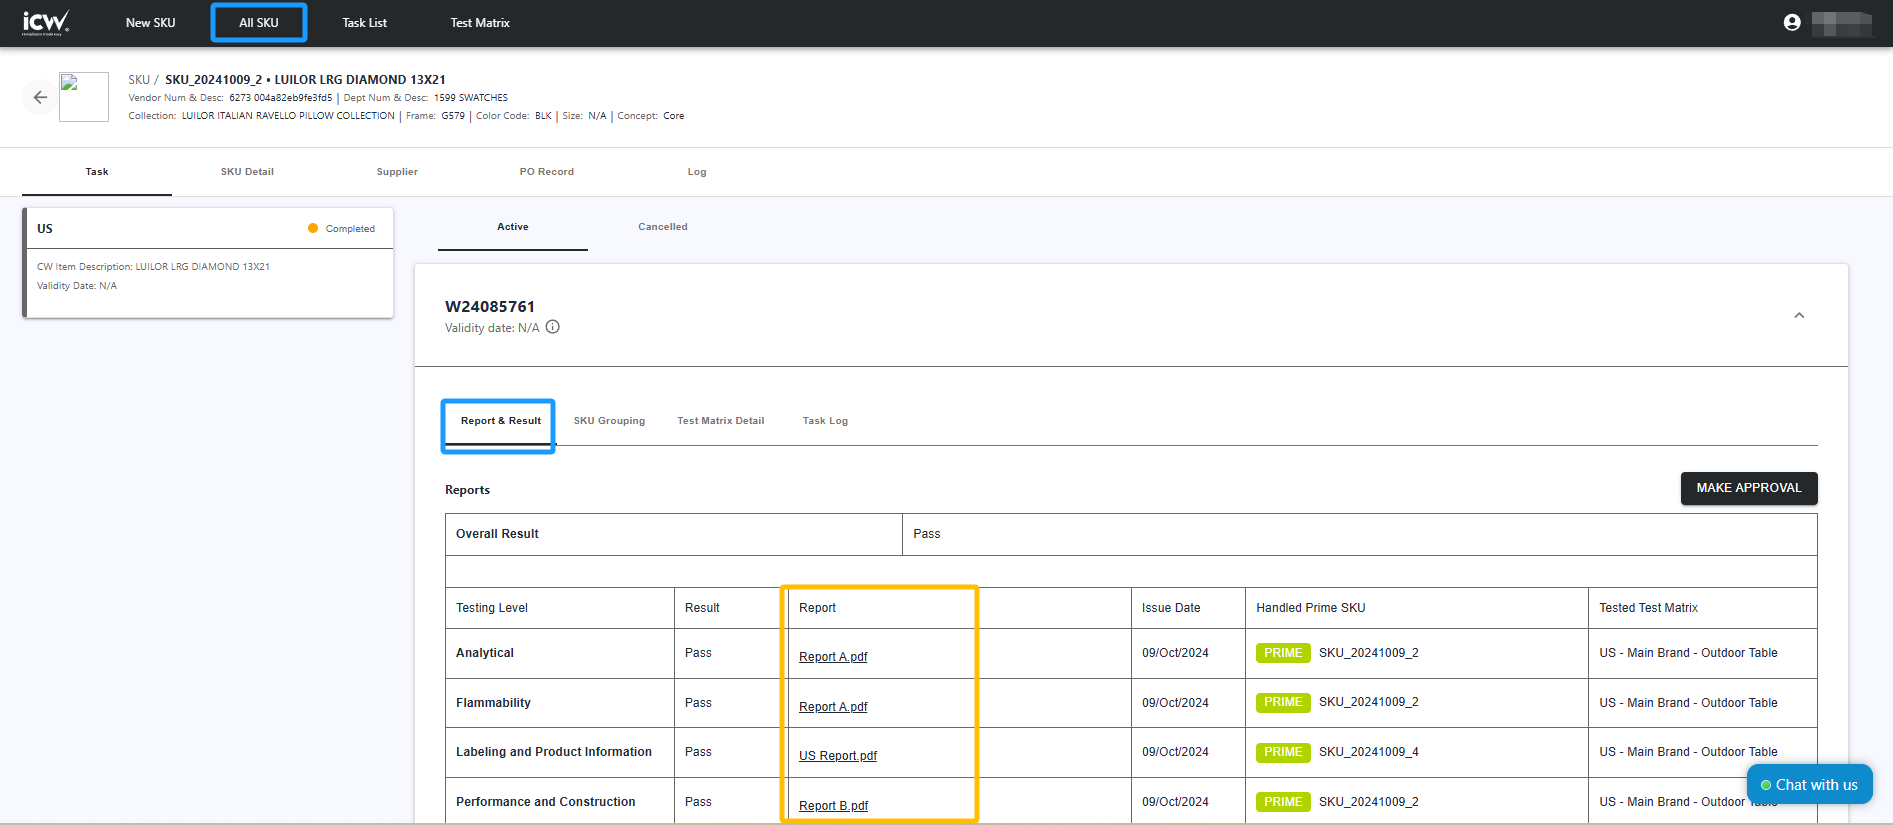
How do I make approval on test reports and result?
To make approval on test reports and result:
Go to All SKU page and select Important Status>Completed or Important Status>Completed-Fail
Select the SKU that you would like to make approval
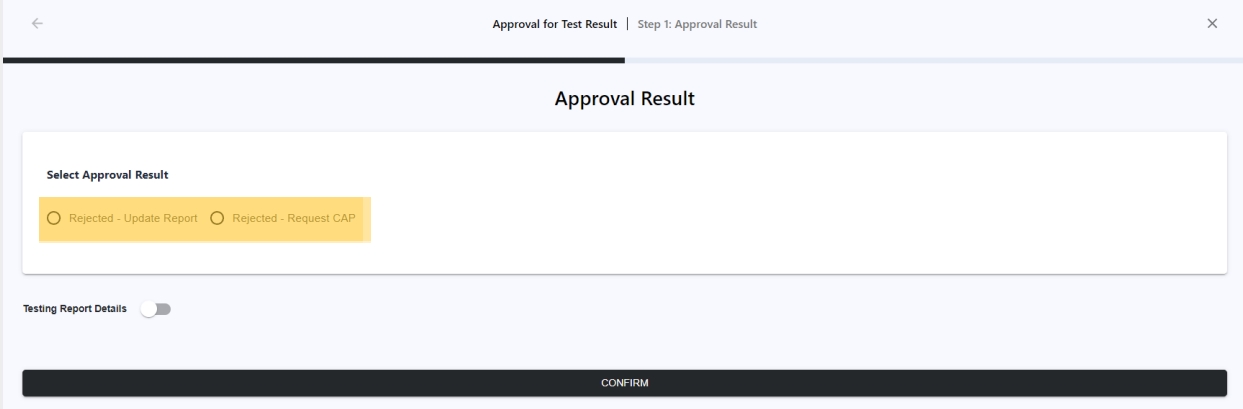
Go to Task for that export market, select Report & Result and select MAKE APPROVAL
Status is updated to Complete-Approved / Complete-Conditional Approved / Completed-Pending / Rejected-Update Report / Rejected-Request CAP depends on the Approval Result submitted by RH.
Export test reports: The test reports can be exported under each tasks > Report & Result > Report.
RH compliance team can view and export test reports for both regulatory tasks and QC tasks.
QC team can view and export testing reports for QC tasks only.
💡
For QC market, Removed Approved / Conditionally Approved options, i.e. approval by RH is optional.
✸ Retest & CAP
How do I make approval of CAP and initiate retest request?
To make approval on CAP:
Go to All SKU page and select Important Status>CAP Pending Approval
Select the SKU that you would like to make approval
Go to Task for that export market, select Report & Result and select VIEW CAP
Select ACCEPT FAIL RESULT (for QC task) / APPROVE CAP / REJECT CAP and submit Approval Result
Retest request will be initiated to Vendor when CAP is approved.
Status is updated to Task Pending (Retest) when APPROVE CAP is submitted by RH. Vendor is required to arrange retest.
Status is updated to CAP Rejected when REJECT CAP is submitted by RH. Vendor is required to submit CAP again.
Status is updated to Complete-Conditional Approved when ACCEPT FAIL RESULT is submitted by RH, which is applicable for Quality test task only. Retest is not required.
How do I trigger retest for an existing SKU of an export market?
SKU can only be created once for each export market. Please contact support_rh@icw.io for assistance.
✸ Test Matrix
💡
Test items, test matrix, and sub-categories will be displayed after they are approved and published by an authorized person in RH.
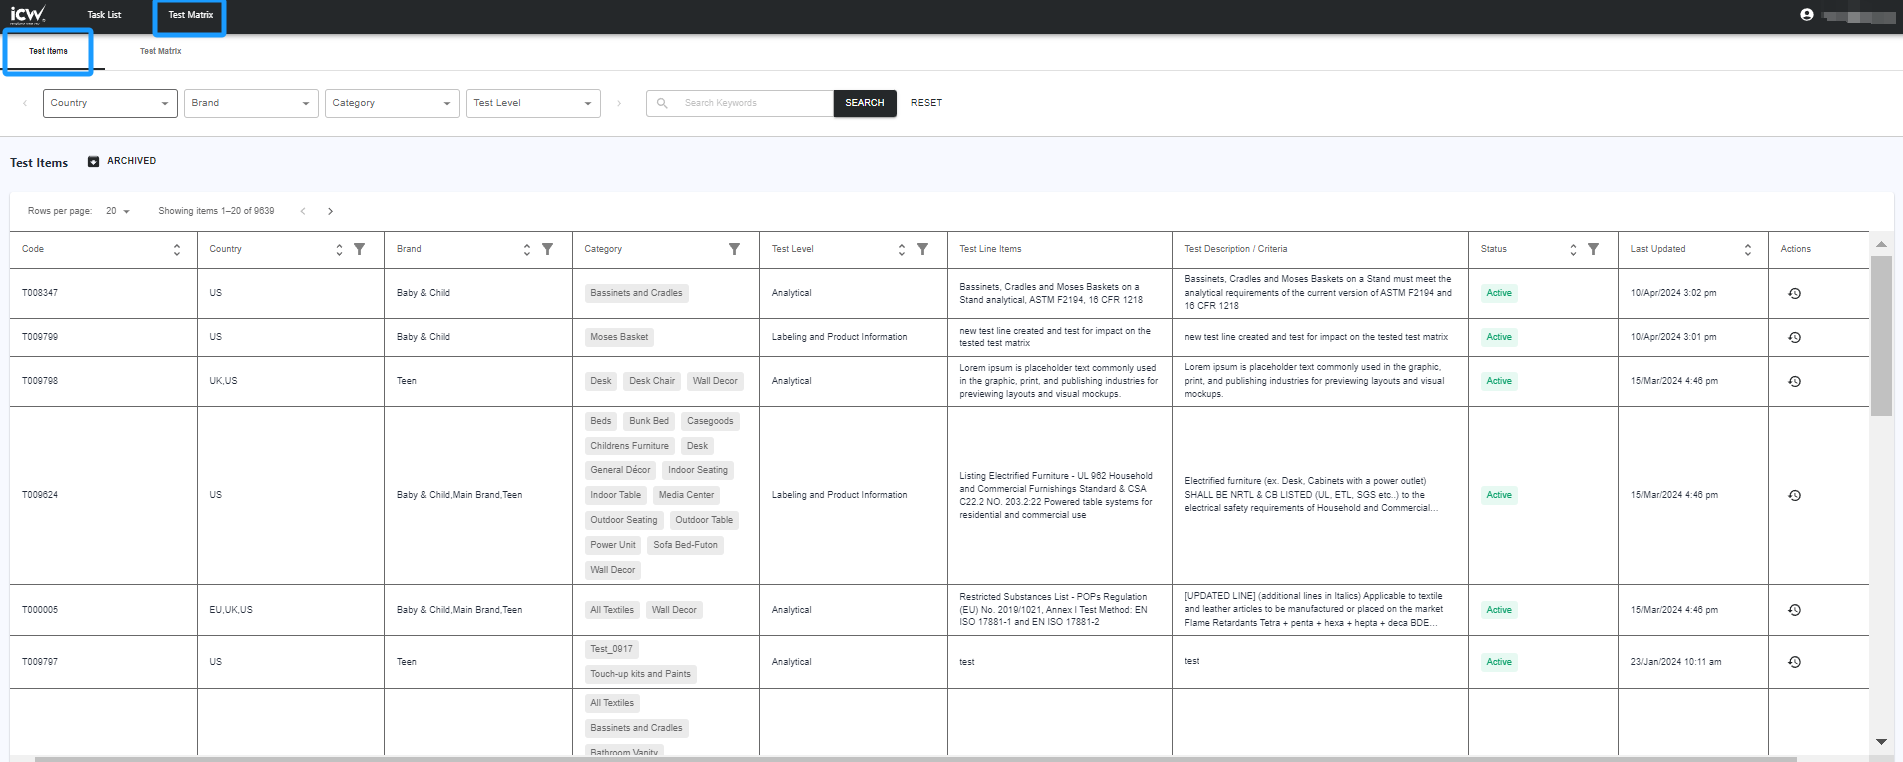
Test Item
How do I create a new Test Item?
Go to Test Matrix>Test Items
Select + CREATE ITEM
Select Categories, provide Test Line Details and Change Reason
Select at least one Sub-Category for the test line during edit. If the test line is no loner applicable for any Sub-Category, archive the test line instead.
How do I archive an existing Test Item?
Go to Test Matrix>Test Items
Select Actions>Archive on the test item that you would like to archive
Prior / After SKU Grouping, test task can be deleted individually, one at a time:
Go to All SKU page
Select the task that you would like to delete
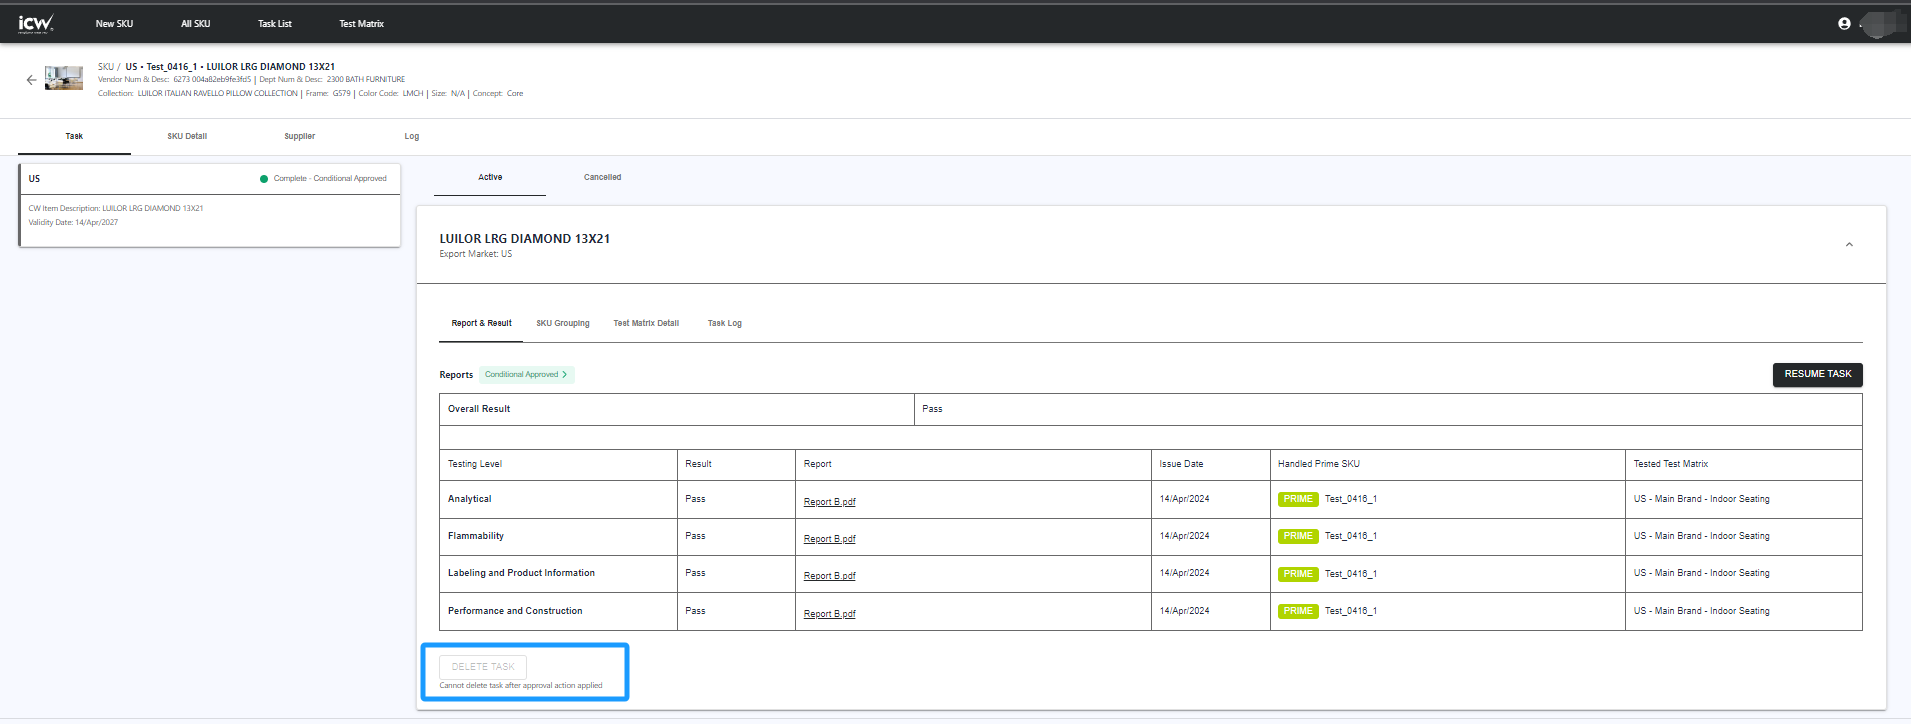
Go to Task for that export market and select DELETE TASK
💡
RH can delete task when the task is prior “Make Approval”.
Task cannot be deleted when the Task status is as follows:
Approved
Conditionally approved
Completed-Pending
Rejected- Request CAP
Rejected - Revise report
CAP pending approval
CAP rejected
Task pending (Retest)
For any approved/rejected tasks, RH must resume the tasks to “Completed” or “Completed fail” before deleting tasks.
For any pim SKU/half prime half pim SKU with above status, RH can edit SKU relationship to change the pim SKU as prime SKU or change to other existing in-flight prime SKU to deleting the tasks.
For tasks that cannot be deleted, a statement “Cannot delete task after approval action applied” will show below DELETE TASK button.
If you use the Bulk Delete feature in New SKU page to remove all imported export markets for the SKU(s) prior SKU grouping, the SKU(s) will be permanently deleted.
If you use DELETE TASK feature to remove each export market task individually, the SKU will be permanently deleted.
How do I resume task(s)?
Go to All SKU page
Select the task that you would like to make changes
Go to Task>Report & Result for that export market, select Resume Task
You can customize the report attributes by choosing which one to display on the report or by applying filters to specific attributes.
SKU Level Reporting
💡
Display SKU details for created SKUs, irrespective of whether they are Prime or PIM, grouped or not. Provide one row for each SKU, covering all export markets.
Vendor Num Vendor Name PIM SKU SrcNum CW Item Description Collection Frame Color Code Size Code Concept Dept NUM Dept DESC Vendor Style Country Of Origin Fabric Fill Finish Function BOM SKU Status Min PO Cancel Date Country Code List Has prop 65 label Remark for prop 65 label US Status Assigned As (US) US Validity Date EU Status Assigned As (EU) EU Validity Date UK Status Assigned As (UK) UK Validity Date
GLB Status GLB Validity Date Assigned As (GLB)
QC Status Assigned As (QC) Imported Date
Task Request Reporting
💡
Display the task requests by export market, irrespective of whether they are Prime or PIM, grouped or not. For Prime/PIM, you can view the associated test matix, test levels and validity date for each task request. Provide one row for each task request by export market.
Vendor Num Vendor Name PIM SKU SrcNum CW Item Description Collection Frame Color Code Size Code Concept Dept NUM Dept DESC Vendor Style Country Of Origin Fabric Fill Finish Function BOM SKU Status Min PO Cancel Date Testing Country Task Number Imported Date RH Task Requested Date Due Date Assigned As Task Status Tested Test matrix (Country) Tested Test matrix (Brand) Tested Test matrix (Category) Tested Test Level Overall Validity Date Involve Retest ?
Submission Level Reporting
💡
Display the task submission by export market, for Prime SKU that have been acknowledged by Vendor. You can view the test status/result by test level, lab costs and factory details for each task submission. Provide one row for each task submission by export market.
Task Number Submission Number Vendor Num Vendor Name PIM SKU SrcNum CW Item Description Collection Frame Color Code Size Code Concept Dept NUM Dept DESC Vendor Item Description Vendor Style Country Of Origin Fabric Fill Finish Function BOM SKU Status Min PO Cancel Date Heat, grease, stains, water, and/or oil resistant? PFAS intentionally added Testing Country Overall Test Result Approval Remark Detail A F L P Q C Tested Test matrix (Country) Tested Test matrix (Brand) Tested Test matrix (Category) Selected Lab for quote Quoted Lab Final confirmed Lab Overall SKU Status Retest task? RH Task Requested Date Vendor Acknowledged Task Date Sample Completion Date Sample Sending Date Sample Received Date (By lab) ECD(TAT) Actual Completion Date (by Lab) Quotation Cost (Currency) Quotation Cost (Price) Final Cost (Currency) Final Cost (Price) Factory Name Factory Address Factory Local Address Factory ID Contact Email Contact Name Contact Number
SKU Relationship
💡
Display the linked PIM for each Prime SKU by task submission.
Vendor Num Vendor Name PRIME SKU SrcNum CW Item Description Collection Frame Color Code Size Code Concept Dept NUM Dept DESC SubDept Vendor Item Description Vendor Style Fabric Fill Finish Function BOM SKU Status Min PO Cancel Date Testing Country Task Number RH Task Requested Date Tested Test Matrix (Country) Tested Test Matrix (Brand) Tested Test Matrix (Category) Linked PIM SKU Number Linked PIM SKU Description Linked Task Number Linked Test Level
How do I create an export report template?
Go to All SKU page
Select EXPORT REPORT
When report template has not been created by yourself or other user, you can select the report type and select NEXT
When report template has been created by yourself or other user, you can select the template that you want to APPLY or SKIP TEMPLATE
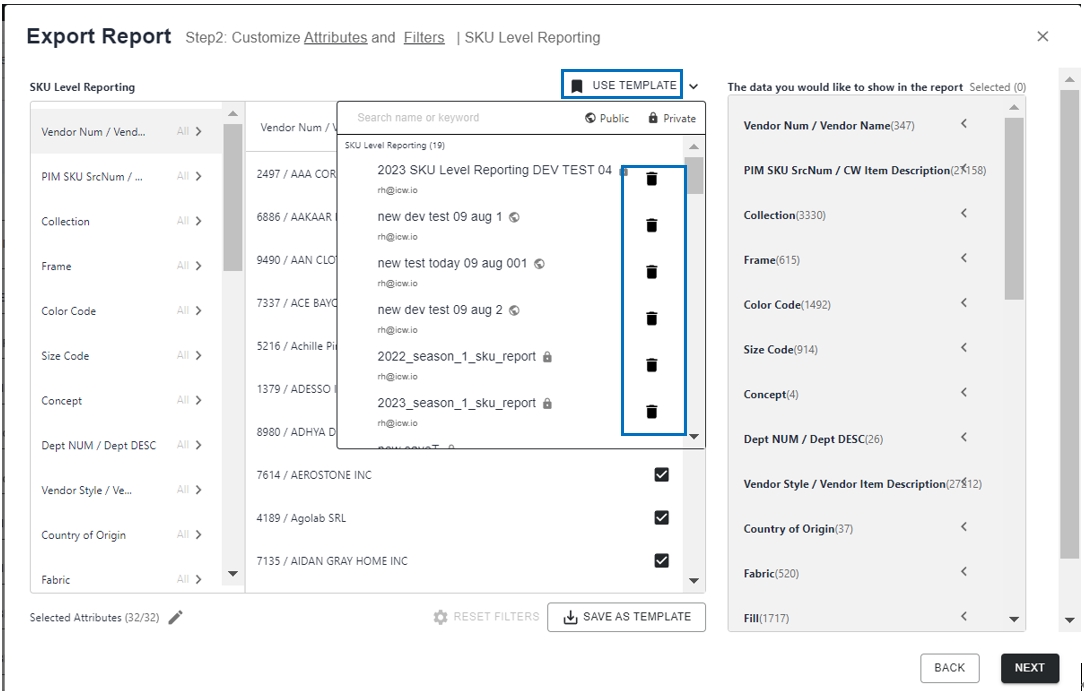
Select attributes and select NEXT
Customize attributes > Select SAVE AS TEMPLATE > Enter Template Name > check or uncheck the Public Template > Select the check mark to save template > Select NEXT
Alternatively, select NEXT > Select Yes, save as template,enter Template Name > select drop down”Add xxx” to apply template name > check or uncheck the Public Template > Select EXPORT
Only specific users from RH Team has access to RH Admin portal. Please contact support_rh@icw.io for assistance if there are any changes in Admin access.
Login Email is not changeable after user creation.
Please contact support_rh@icw.io should you require to create a new Department.
RH users will be notified of tasks update for the departments assigned to them in the Admin portal. If there are any changes needed to their department assignments, RH users should request an admin user to add or remove department.
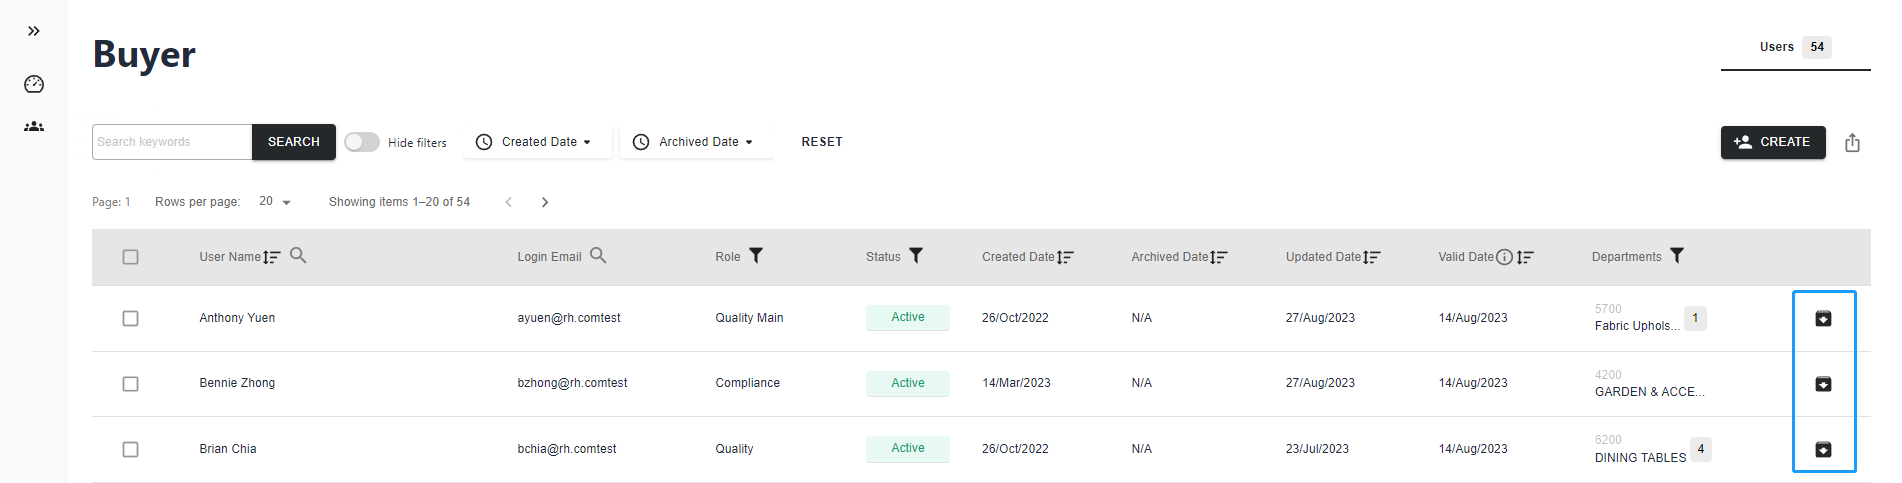
How do I archive Buyer user?
Go to RH Admin>Users>Buyer>User
Select ARCHIVE ACCOUNT next to the Buyer user
🖼️
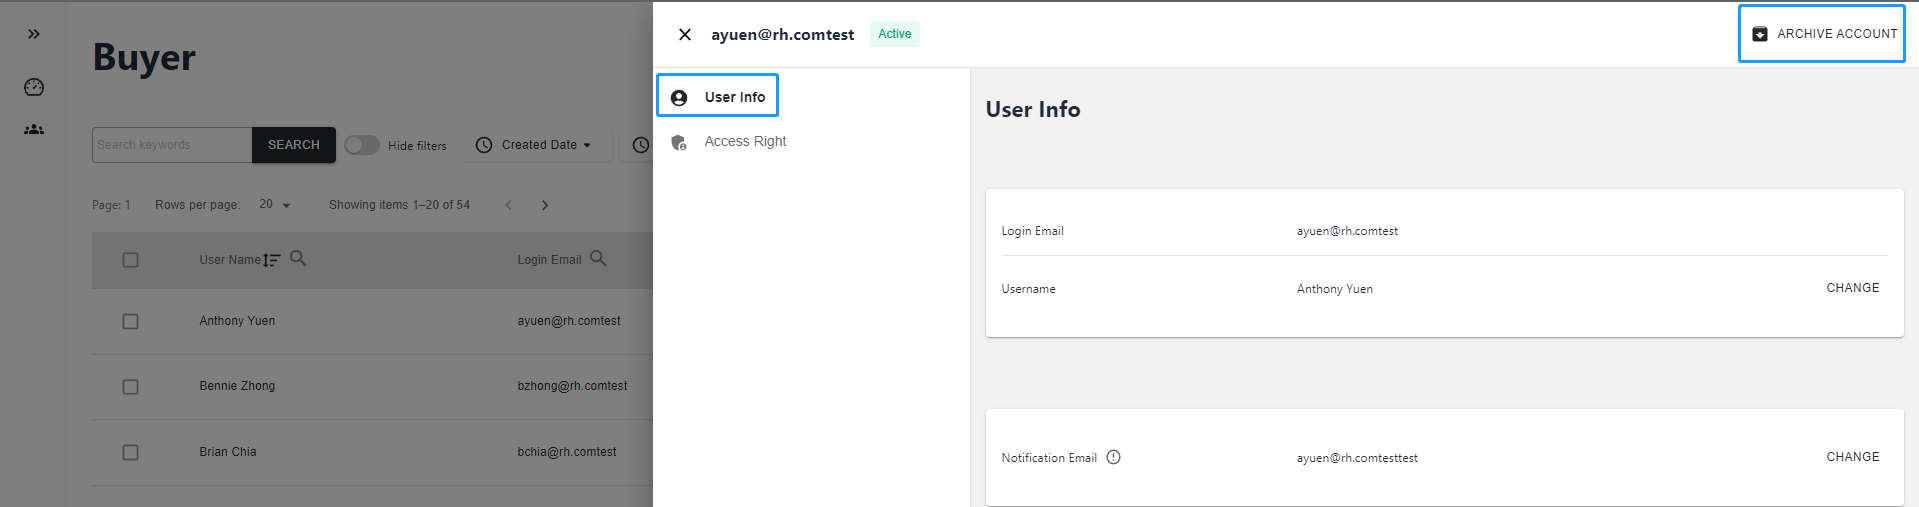
Alternatively, Select the Buyer user that you would like to make change, select ARCHIVE ACCOUNT in User Info or Access Right
🖼️
💡
Notes:
Archived user will be counted as subscription users within the current subscription period.
Archived record will be kept within the current subscription period only, after that, record will be removed.
No email notification will be sent to Archived user.
How do I unarchive Buyer user?
Go to RH Admin>Users>Buyer>User
Select Status>Archived
Select the archived Buyer user that you would like to unarchive
Select UNARCHIVE ACCOUNT in User Info or Access Right
🖼️
💡
Notes:
Unarchived user will be counted as subscription users within the current subscription period.
Instant Account Activaition email notification will be sent to the unarchived user’s Login Email. If the activation email link expires within 24 hours, the user should click "Forgot password" to reset their password and activate their account.
How do I export Buyer users?
Go to RH Admin>Users>Buyer>User
Select EXPORT ALL to export active and archived Buyer users.
Select EXPORT ACTIVE USER to export active Buyer users.
Sub Supplier ID should be different from Supplier ID. One Supplier can be linked to multiple agency companies. Please leave Agency Company blank if Agency linkage is not required.
The login email address is used for receiving the user activation email and reset password link.
The email notification address is used for receiving iCW notifications about task updates.
How do I edit Supplier user?
Go to RH Admin>Users>Supplier>Companies
Select the Supplier Company that you would like to edit
Select Company info to change supplier name, supplier contact information, the linked agency company and sub supplier ID
Select Users > On Active Users page, Select CREATE USER, Archive or Edit to change the users.
Select Support Documents > Select UPLOAD, Bulk Download or Delete document for document management.
When supplier users are listed in the Archived Users list, it is not possible to create users with the same login email address. Please unarchive the user directly.
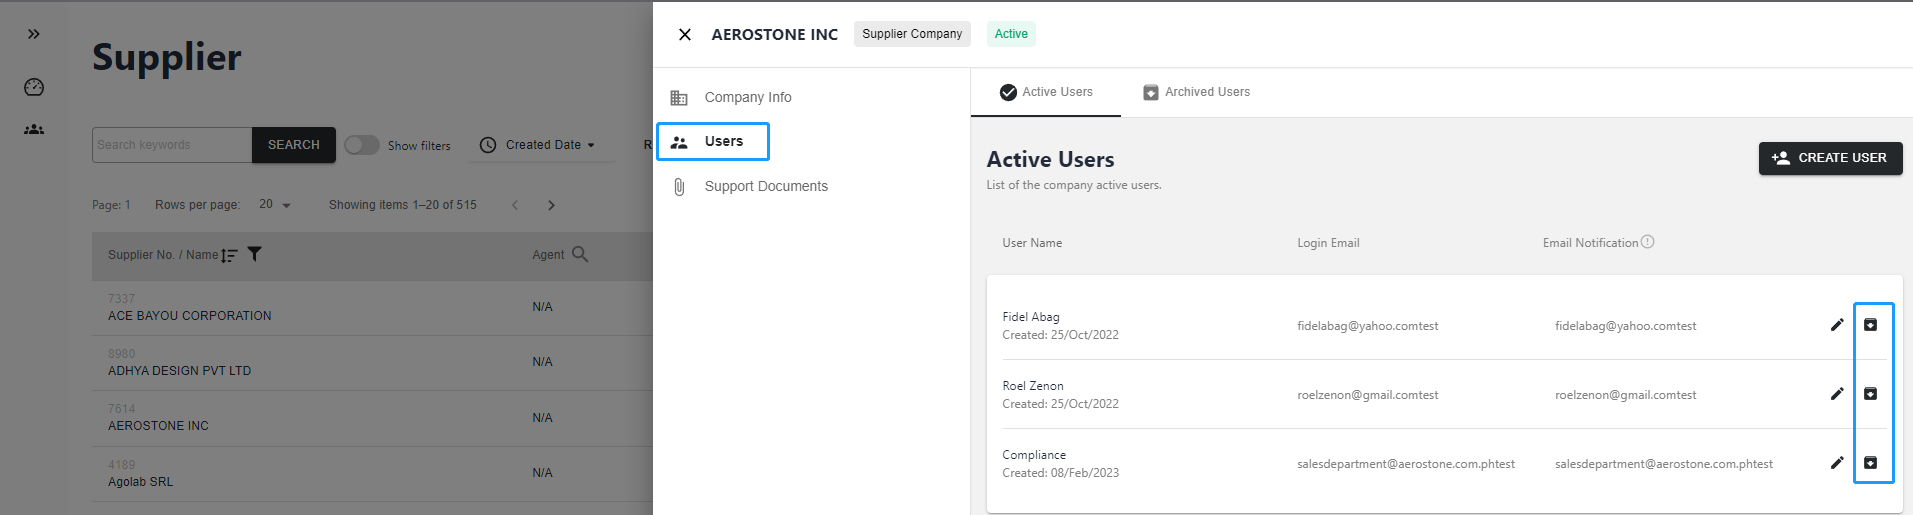
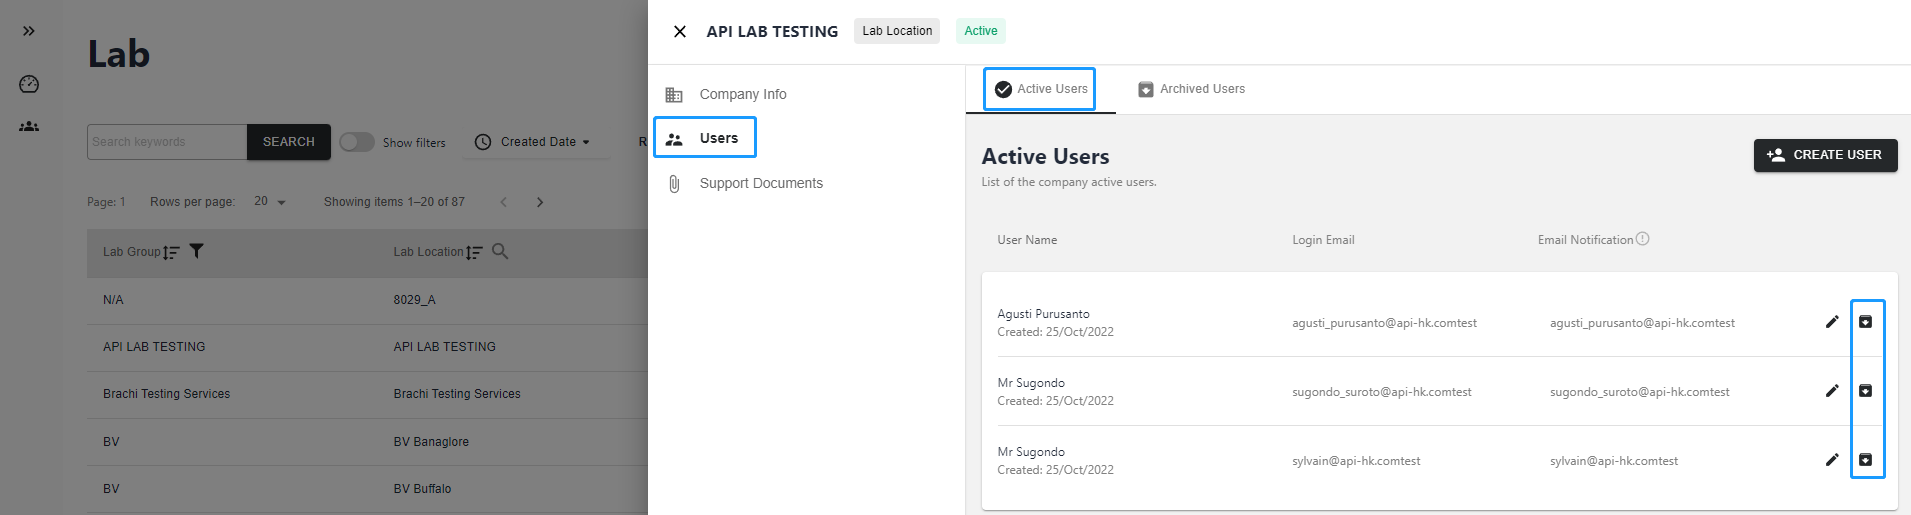
How do I archive Supplier user?
Go to RH Admin>Users>Supplier>Companies
Select the Supplier to continue
Select Users > On Active Users page, select Archive
🖼️
💡
Notes:
The archived users will be counted as subscription users within the current subscription period
No notification email will be sent to an archived user
If the supplier has outstanding tasks, the last supplier user cannot be archived
If the supplier does not have any outstanding task, the supplier company will also be deactivated once the last supplier user is archived
Create a SKU or Import Monday Feed is workable when supplier is active with active user.
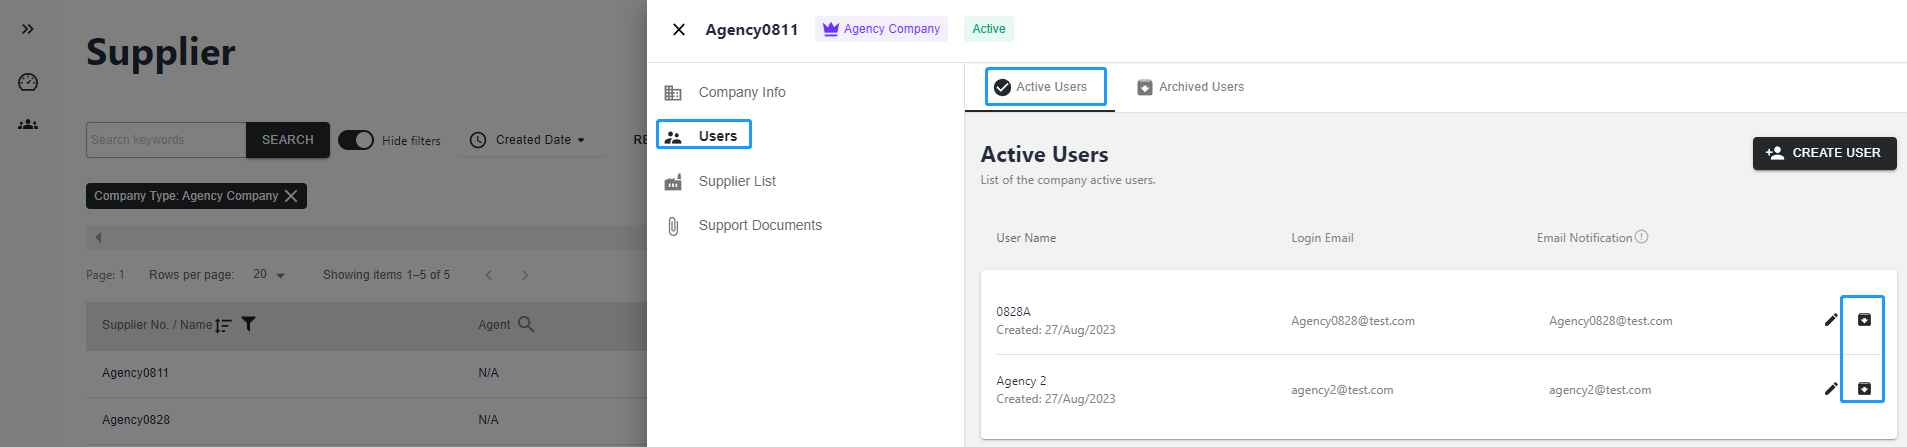
How do I unarchive Supplier user?
Go to RH Admin>Users>Supplier>Companies
Select the Supplier Company that you would like to unarchive
Select Users > On Archived Users page, select Unarchive
🖼️
💡
Notes:
Unarchived user will be counted as subscription users within the current subscription period.
Instant Account Activaition email notification will be sent to the unarchived user’s Login Email.
How do I export Supplier companies?
Go to RH Admin>Users>Supplier>Companies
Select Company Type>Supplier Company
Select EXPORT ALL to export active and archived Supplier companies.
🖼️
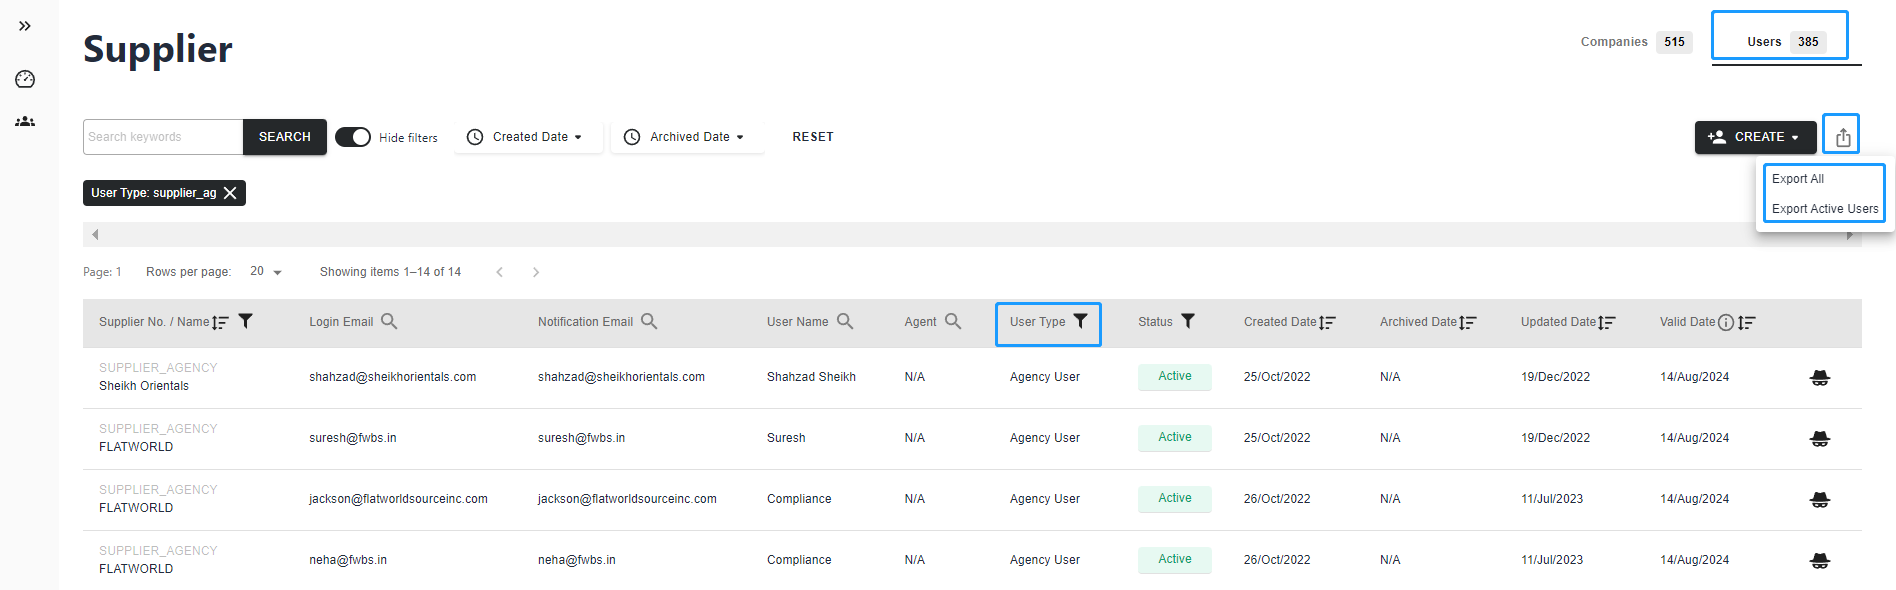
How do I export Supplier users?
Go to RH Admin>Users>Supplier>Companies
Select User Type>Supplier
Select EXPORT ALL to export active and archived Supplier users
Select EXPORT ACTIVE USER to export active Supplier users
🖼️
Agency
How do I create Agency company?
Go to RH Admin>Users>Supplier>Companies
Select CREATE>Agency company
Fill in Company Info , + SELECT SUPPLIER to link it with Suppliers and CREATE USER
Select Users > On Active Users page, select CREATE USERS to add new Lab Admin user to an existing Lab Group
Select Users > On Active Users page, select Edit User to change Lab Admin user details
Select Lab Locations > Select CREATE LAB LOCATION to create new Lab Location for existing Lab Group
Select Lab Locations > Select Delete LAB LOCATION to remove the linkage between existing Lab Location and Lab Group
Select Support Documents > Select UPLOAD, Bulk Download or Delete document for document management
💡
Please ensure the right Lab Group is selected for related Lab Locations, as that determines the Lab Locations selection during Acknowledge and Quote flow by Supplier. You can manage the change in Lab > Locations page.
The archived Lab location status will be changed to Inactive.
💡
The "Archived" lab location will appear as "Inactive" in Admin. Vendors will no longer be able to view or select the lab during the acknowledge tasks flow.
“Archive” a lab location does not “Archive” the users associated with that location.
Users of the "Inactive" lab location who remain "Active" will still have access to the platform and can manage existing tasks as usual.
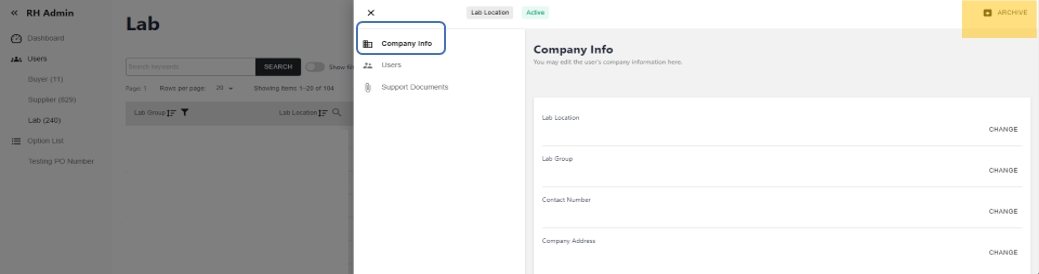
How do I unarchive Lab location
Go to RH Admin>Users>Lab>Locations
Select the Lab Location to continue
Select Company info > select UNARCHIVE
🖼️
The unarchived Lab location status will be changed to Active.
💡
There are two ways to unarchive a lab location:
Manually "Unarchive" a lab location if there are any active users associated with it.
If there are no active users, at least one new user must be created for the lab location, or an archived user must be "Unarchived". This will automatically update the lab location status to "Active".
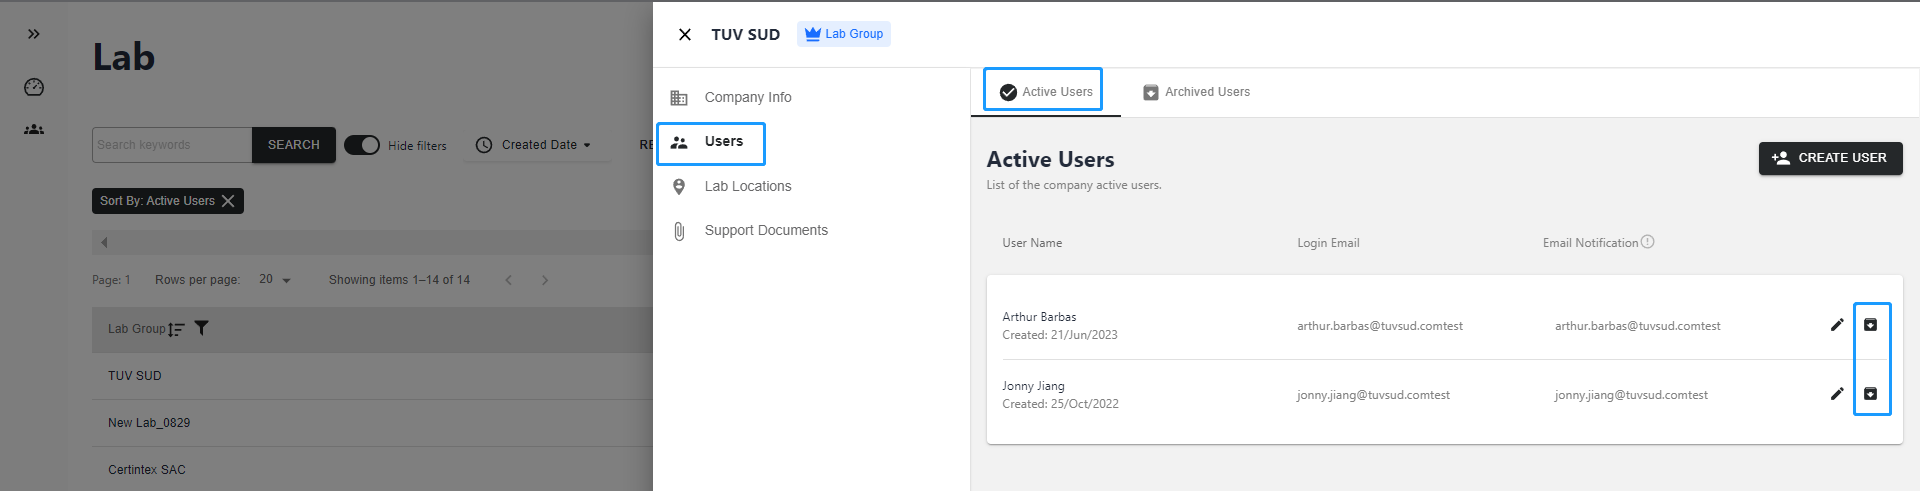
How do I archive Lab location users?
Go to RH Admin>Users>Lab>Groups
Select the Lab Location to continue
Select Users > On Active Users page, select Archive
🖼️
💡
Notes:
The archived users will be counted as subscription users within the current subscription period.
No notification email will be sent to an archived user.
Archive the last Lab location user is supported if there is no outstanding task for that lab location. Error message will pop up if the lab location that you want to archive involves outstanding tasks.
The active users could associate with an Active or Inactive lab locations.
How do I unarchive Lab location user?
Go to RH Admin>Users>Lab>Groups
Select the Lab Location to continue
Select Users > On Archived Users page, select Unarchive
🖼️
💡
“Unarchive” users from an Inactive Lab location will “Active” the lab location again.
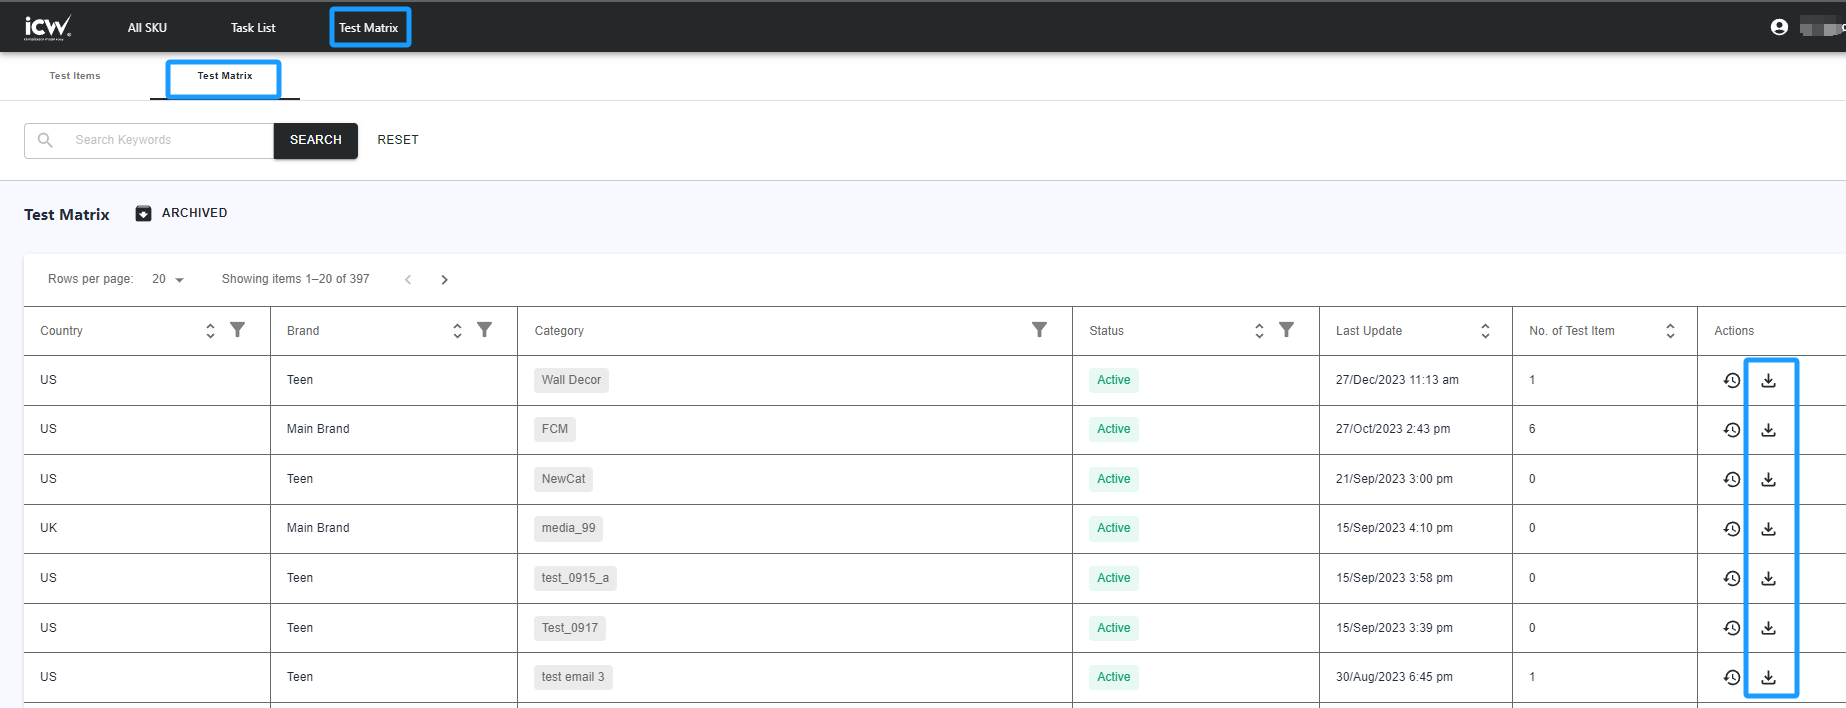
How do I export Lab groups?
Go to RH Admin>Users>Lab>Groups
Select Export All to export all Lab Groups
🖼️
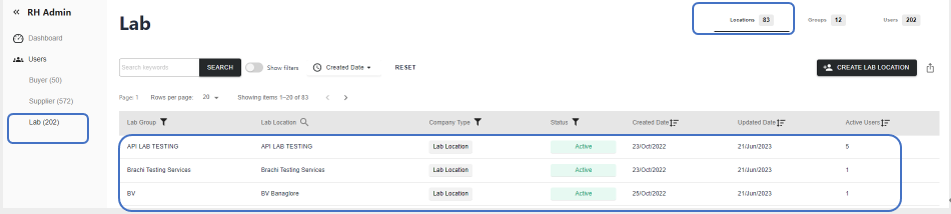
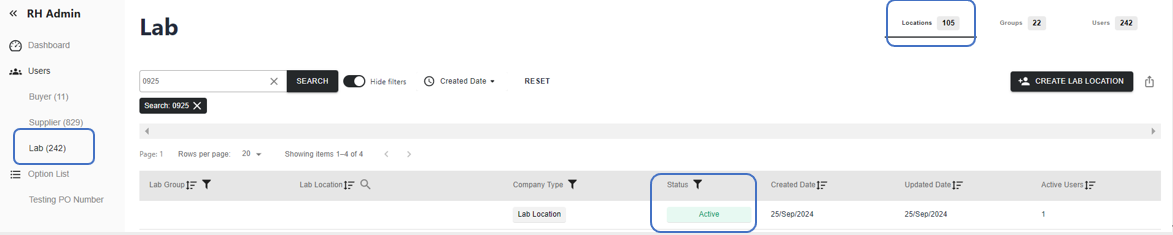
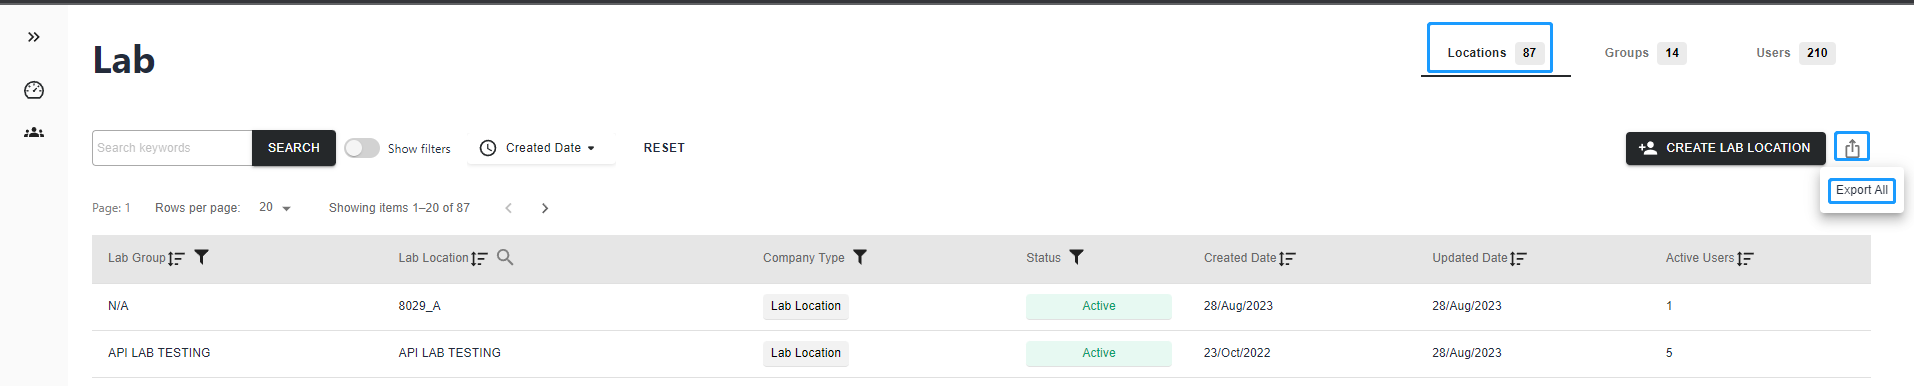
How do I export Lab locations?
Go to RH Admin>Users>Lab>Locations
Select Export All to export active and archived Lab Locations
🖼️
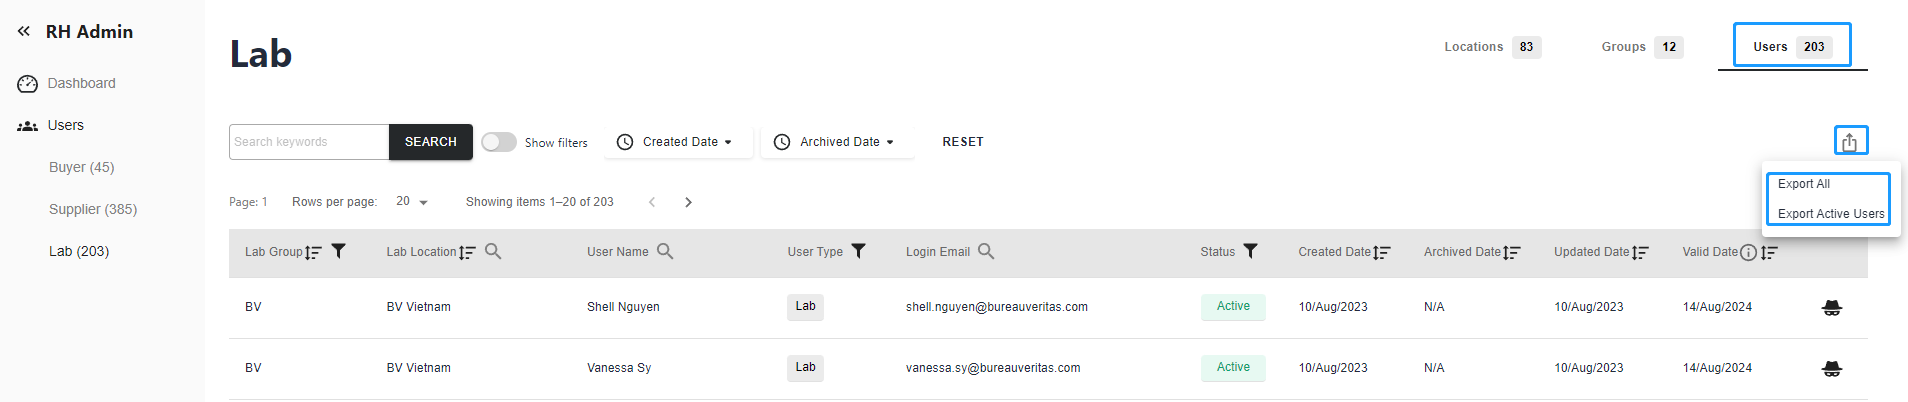
How do I export Lab users?
Go to RH Admin>Users>Lab>Users
Select EXPORT ALL to export active and archived Lab users
Select EXPORT ACTIVE USER to export active Lab users
🖼️
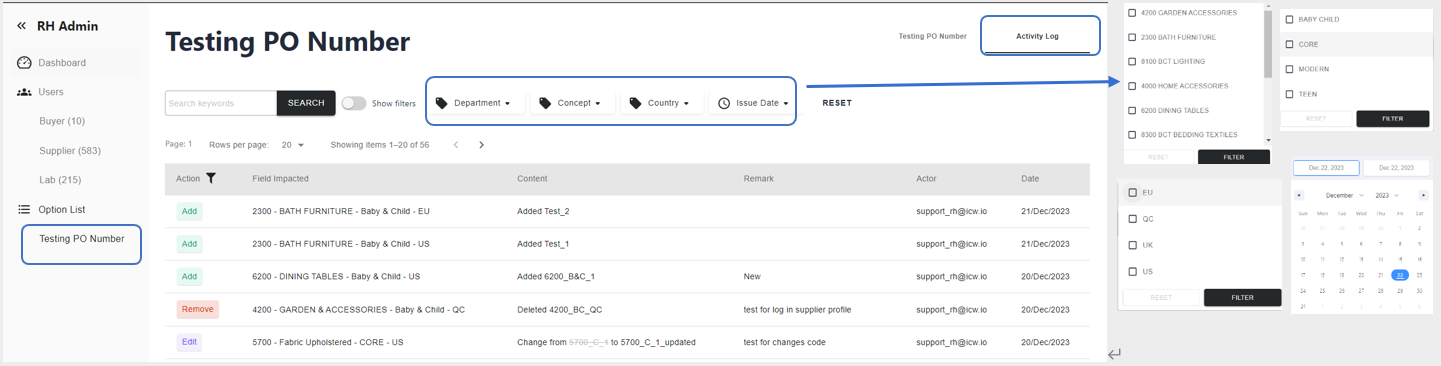
Testing PO Number Maintainence
How do I add Testing PO Number?
Go to RH Admin> Testing PO Number
Add Testing PO Number for each department by Concept and Export Market
Select Department Desc > select ADD > input New Testing PO Number and Remarks (optional) > SAVE
💡
Assign Testing PO Number for each department by Concept and Export Market. Same Testing PO number can be applied to different Department, Concept, and Export Market.
Testing PO numbers are created to manage and identify invoices covered by RH.
RH Admin decides on the applicability of Testing PO numbers for selective suppliers.
The Testing PO number is automatically applied to each TRF when the supplier confirms the quote, provided Testing PO number has been applied to the supplier.
The Testing PO number is displayed in the TRF and Invoices sections of each task.
The lab can include the Testing PO number in their invoice offline for RH payment processing.
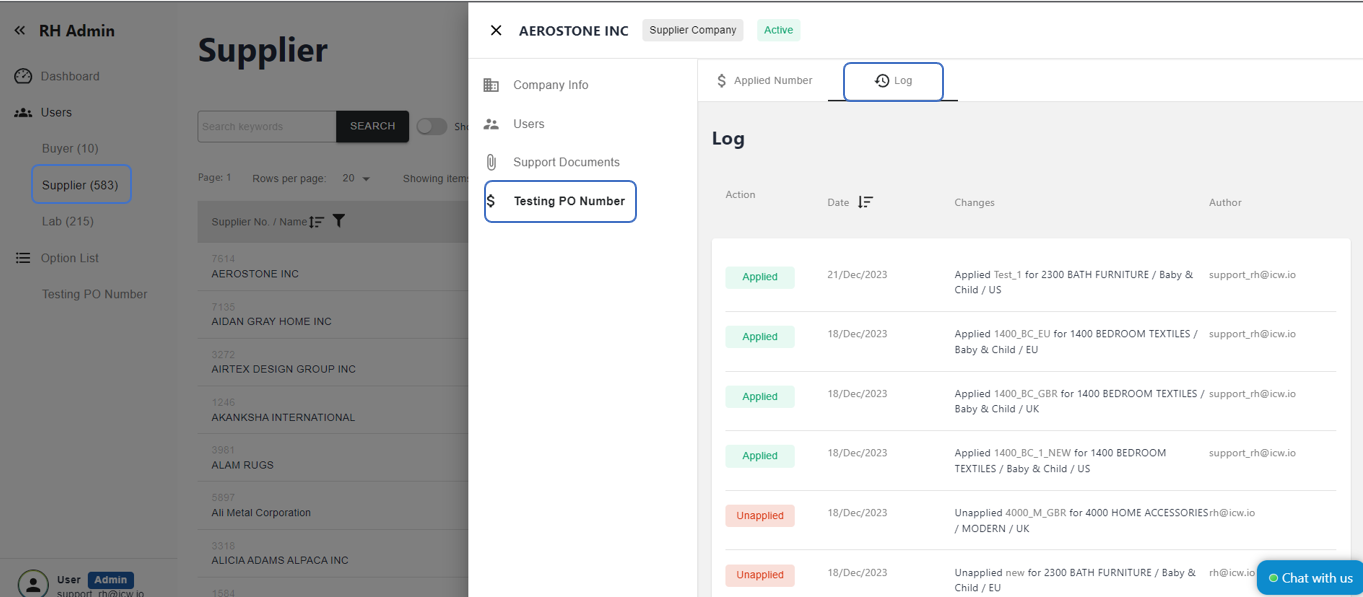
How do I view Testing PO Number Linkage to suppliers?
View the Suppliers with Testing PO Number applied, select the number with hyperlink next to Suppliers > Select specific linked supplier > Direct to the specific supplier Testing PO Number > Applied Testing PO Number
💡
To remove the Testing PO Number linkage to a specific supplier, go to Supplier > Companies to unapply the Testing PO Number.
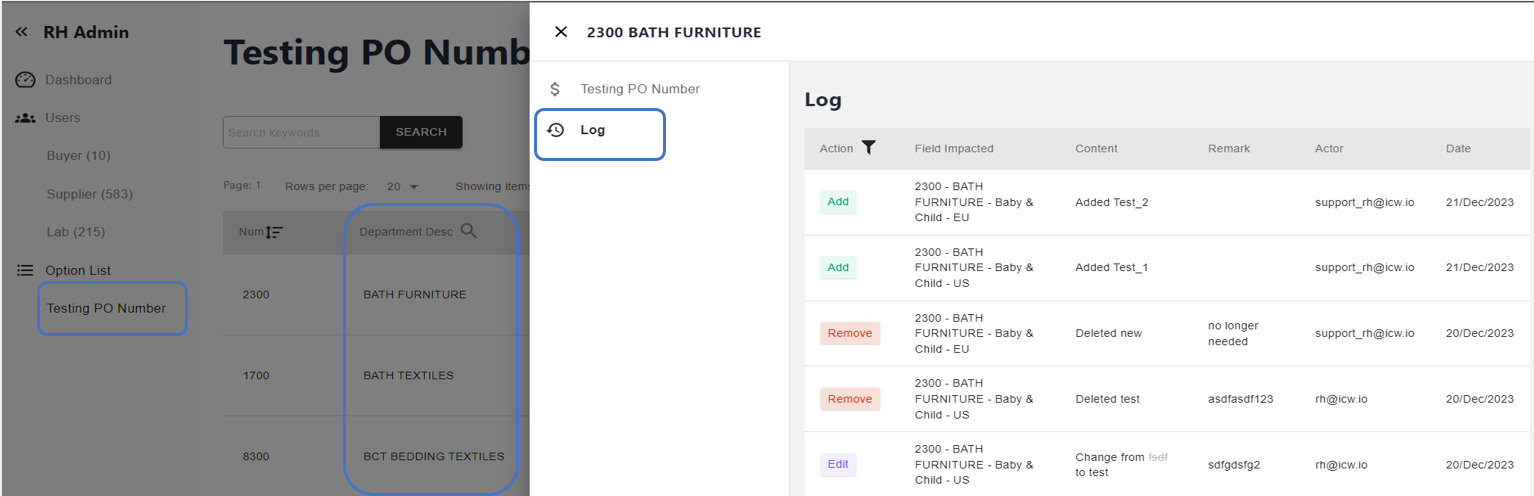
How do I keep track of activities and changes of SKU/Task?
Log features enable you to keep track of activities and changes made on the platform (since 11 Apr 2023):
Update Log time zone from UTC to PT time.
SKU Log (visible to RH and Vendor)
Select a specific SKU from the All SKU page
Go to Log tab to view the activities and changes made
💡
The Log records the actions in chronological order performed by users, such as task(s) creation/deletion, changes of SKU details including SKU information, SKU images and other SKU supporting documents.
Go to Task Log tab to view the activities and changes made
💡
The Task Log records the actions in chronological order performed by users for a specific test task of an export market, such as SKU relationship, status changes from Task Pending to Completed or Completed-Fail, approval status changes, trigger of re-test and its related changes.
Go to Log tab to view the activities and changes made
💡
The Log records the actions in chronological order performed by users for an individual test task, such as status changes from SKU acknowledgement to Completed or Completed-Fail, lab changes, report and result changes, information changes including factory details, billing details.
How do I edit a submitted CAP (Corrective Action Plan)?
CAP can only be submitted once, please note that changes is not allowed unless RH rejects it. In case changes is required, please contact RH to reject CAP so that you can re-submit again online.
How do I edit a submitted Billing Details?
To edit previous submitted billing details:
Go to Task List page
Select the Task that you would like to like to make changes
Go to Invoices tab
Select EDIT next to Billing Details to make changes
💡
Note: The invoice billing detail cannot be edited after tasks are completed, please contact ICW Supporting Center support_rh@icw.io to get assistance.
To cancel a test task that has been initiated to the Lab:
Go to Task List page
Select the Task that you would like to cancel
Select ACTIONS>Cancel Task
💡
Progress is updated to Cancelled when the test task is cancelled. This action is irrevocable, both Vendor and Lab will not be able to take action on cancelled task. Vendor is required to go to All SKU page to start Acknowledge and Quote process again for that SKU for related export market.
💡
Test Task cannot be cancelled before Quote Confirmed status.
Test Task cannot be cancelled after Completed status.
Agents can view the progress of all test tasks for your vendors on the platform, but do not have editing rights. All actions related to test tasks are handled by vendors themselves.
Update status to Pending when the test is on hold.
Update status to In Progress when the test is under processing. Expected Completion Date (ECD) is mandatory.
Update status to In Progress – Update Result & Reports when test result and report is available for upload. You can input the Issue Date from today or before when uploading Reports & Results. Future date is not allowed.
Update status to Completed when the test task is completed and ready for RH approval. You are required to review/update the final cost when completing the test task. The maximum character length for the field of Test Item in invoice is set to a default of 255.
💡
Status would be further updated to Complete-Approved / Complete-Conditionally Approved / Pending Upload CAP / CAP pending approval / CAP approved after Completed. This reflects the approval status for reference only, you do not need to take any action.
Retest handing is the same as new test task. You can see Retest below Task No.
To work on Retest request from Vendor:
Go to Task List page and Make a Quote when quotation is requested by Vendor.
💡
Progress is Waiting for Lab Quote when quotation is required from Lab.
Progress is Quote Confirmed when quotation is not required from Lab. Please wait until the Progress is changed to Sample Sent to update the sample receiving status and test progress.
How do I keep track of activities and changes for a test task?
Log features enable you to keep track of activities and changes made on the platform (since 11 Apr 2023):
Task List Log (visible to RH, Vendor and Lab)
Select a specific task from the Task List page
Go to Log tab to view the activities and changes made
💡
The Log records the actions in chronological order performed by users for an individual test task, such as status changes from SKU acknowledgement to Completed or Completed-Fail, lab changes, report and result changes, information changes including factory details, billing details.
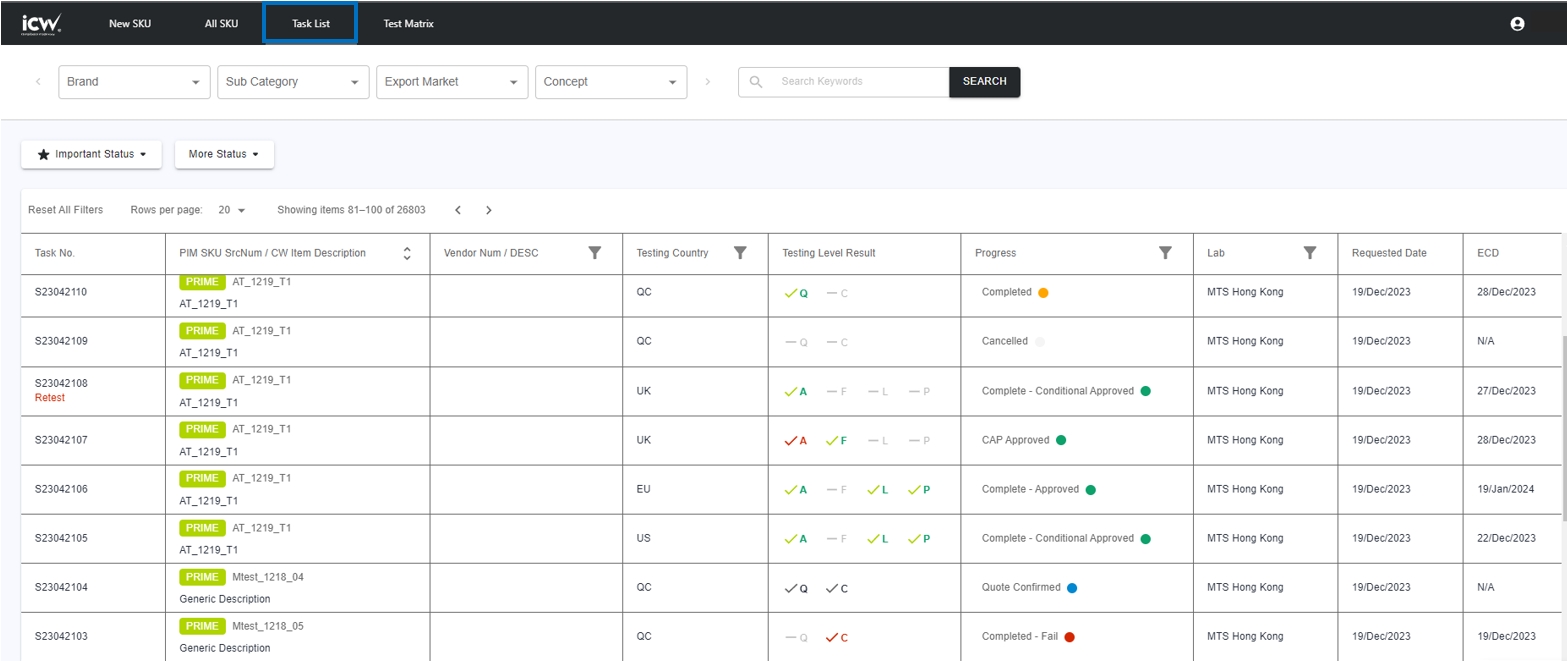
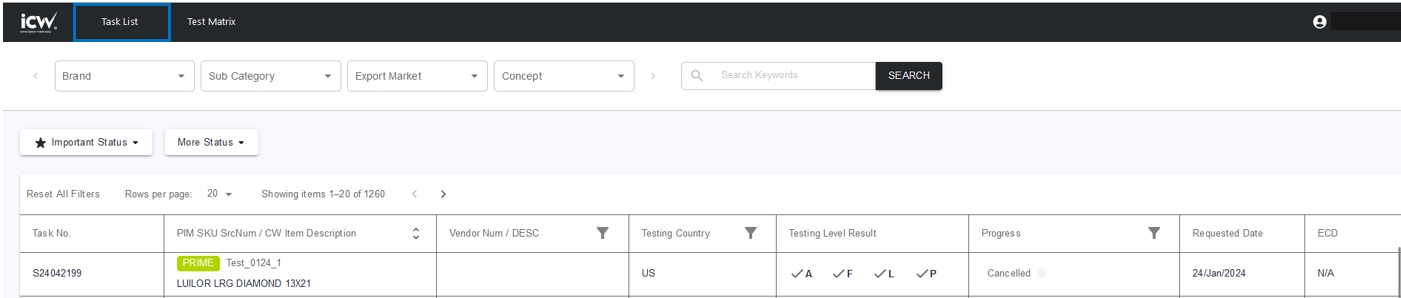
Progress shows as Cancelled when a task is cancelled by Vendor. This action is irrevocable, both Vendor and Lab cannot take action on Cancelled task.
Please discuss with Vendor offline shall there be any concern on a Cancelled task.
Go to Task list page > Select the Cancelled Task
🖼️
What should I do when a test task is rejected?
Progress shows as Rejected when your quote was not selected and not confirmed by Vendor i.e. Vendor confirmed the other quote. Lab cannot take action on a Rejected task.
Please discuss with Vendor offline shall there be any concern on a Rejected task.
Go to Task list page > Select the Rejected Task
🖼️
What should I do when a test task is Complete-Approved / Complete-Conditionally Approved / Pending Upload CAP / CAP pending approval / CAP approved?
The approval status in Task list is for reference. Lab cannot take action on it.
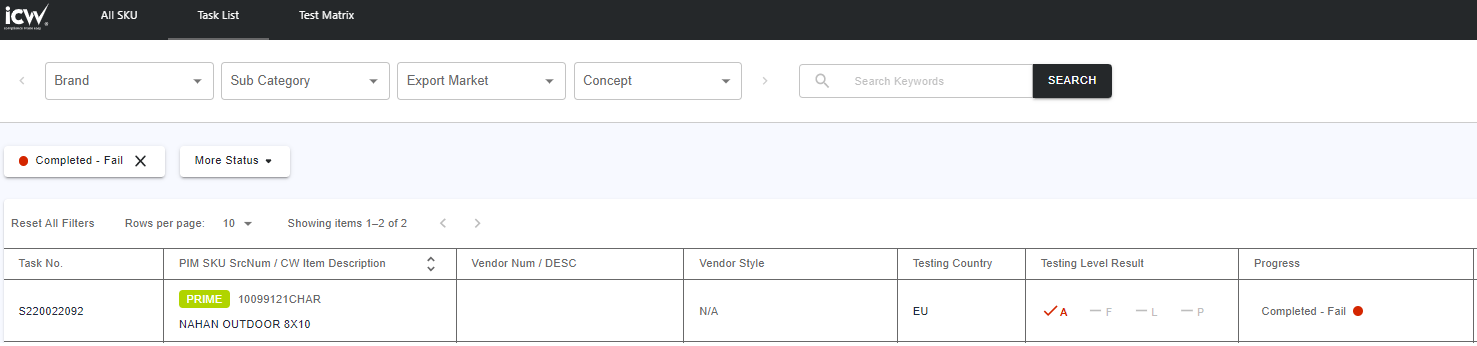
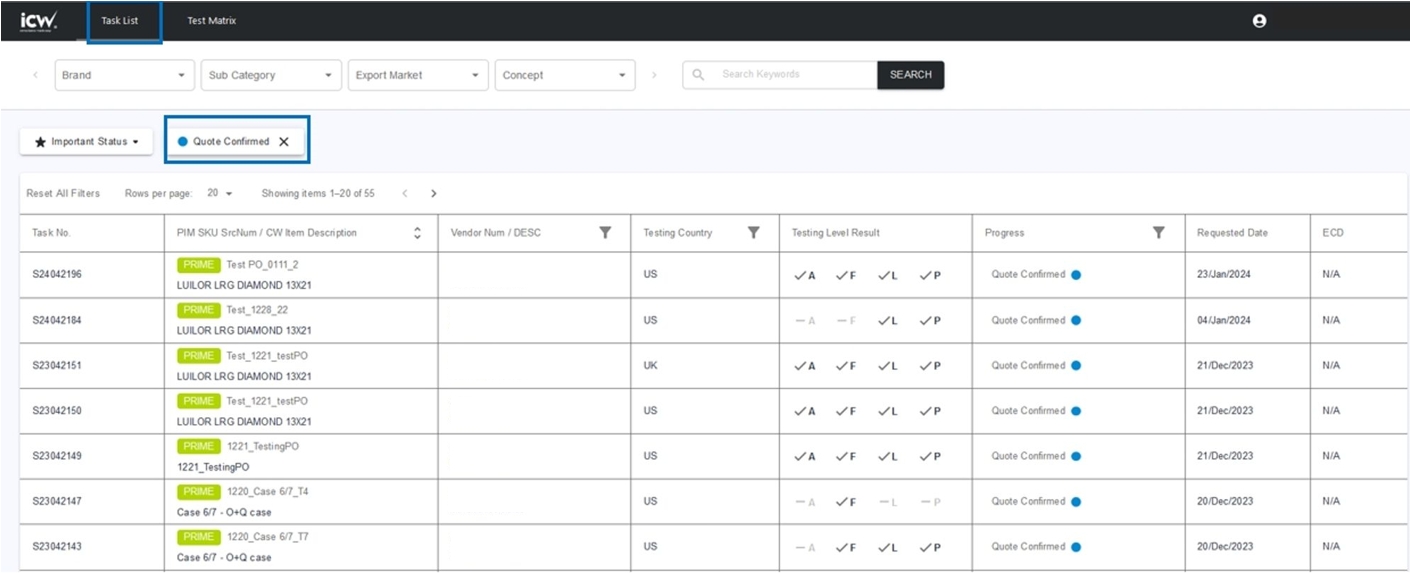
Go to Task list page > Filter the approval status by filtering Progress
🖼️
★ I’m Lab Admin
How do I assign the test task from one lab location to another lab location?
Lab Admin can re-assign lab location after quotation is confirmed by Vendor:
Go to Task List page and select the task that you would like to make changes
Select ACTIONS>Re-Assign Lab Location
Select Assign Lab
The test task will be removed from Task List of original Lab Location, and will be shown on Task List of newly assigned Lab Location.
💡
Before quotation confirmed, Lab Admin cannot re-assign lab location, as Vendor can add other lab or other lab location by themselves.

 📽️
📽️ 💡Overall task status for regulatory tests of each export market and quality tests are based on the priority of each task status for the involved test tasks.
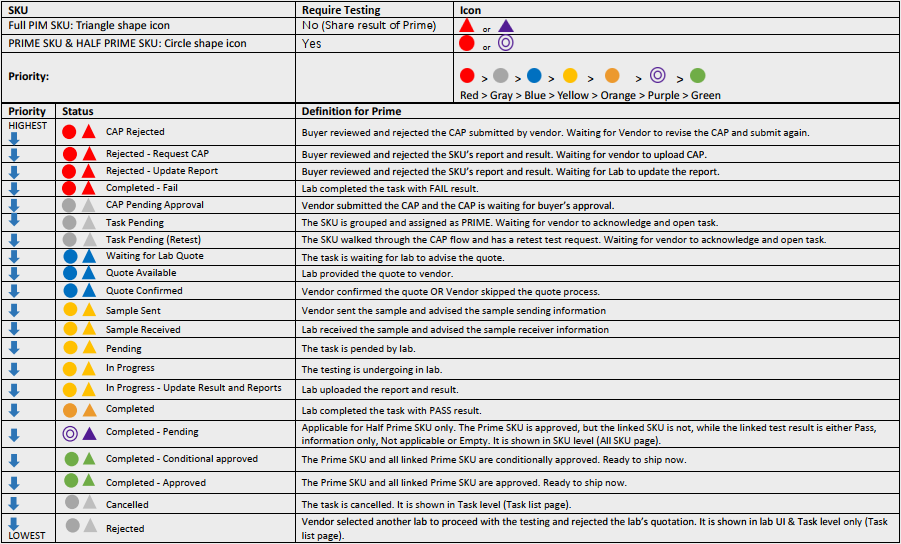

 💡The status indicated in the "Task list" reflects task status, which may vary from the overall status displayed on the "All SKU" page.
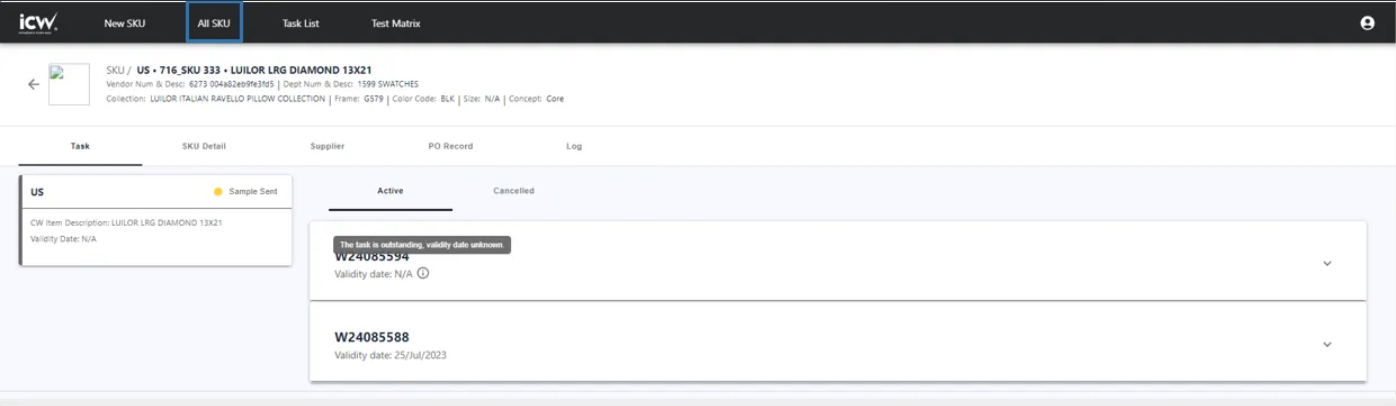
 💡The deleted tasks can be viewed in Cancelled Tab
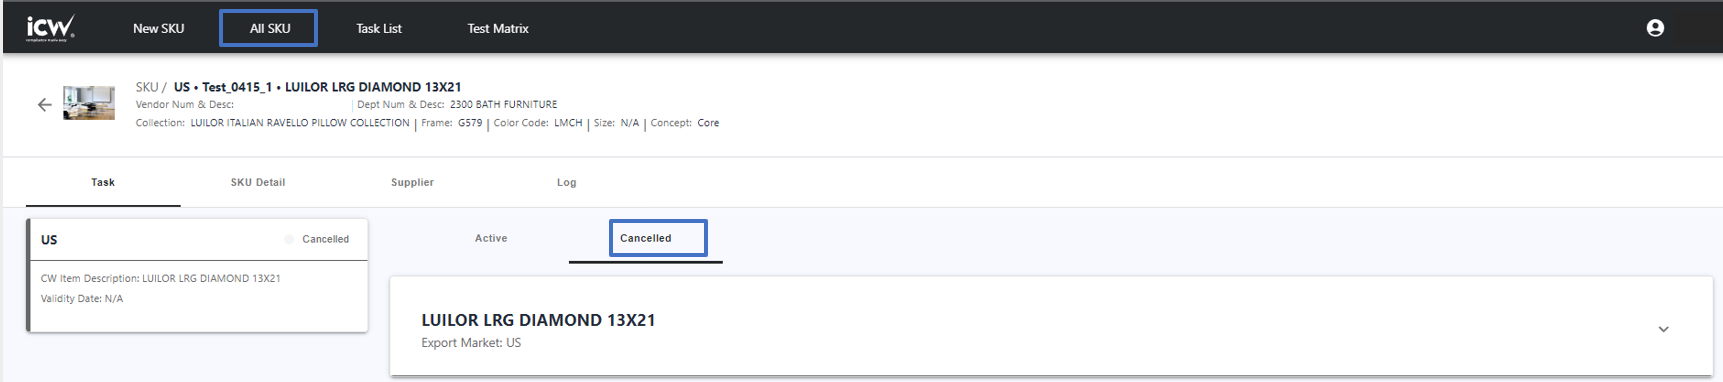 📽️Video Tutorial
 📽️💡💡Report Attributes
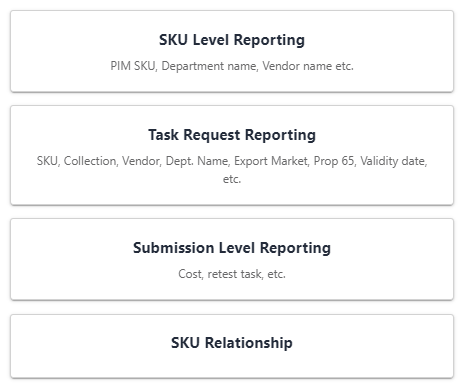
 📽️
📽️ 💡Notes:
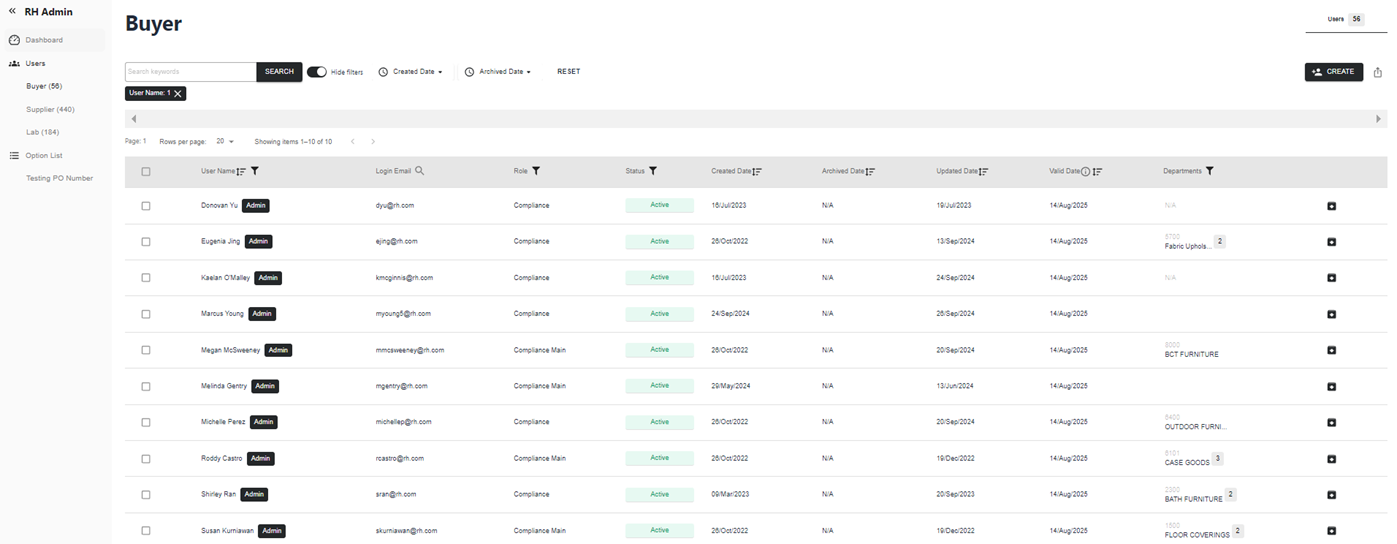 💡
💡
 💡Notes:
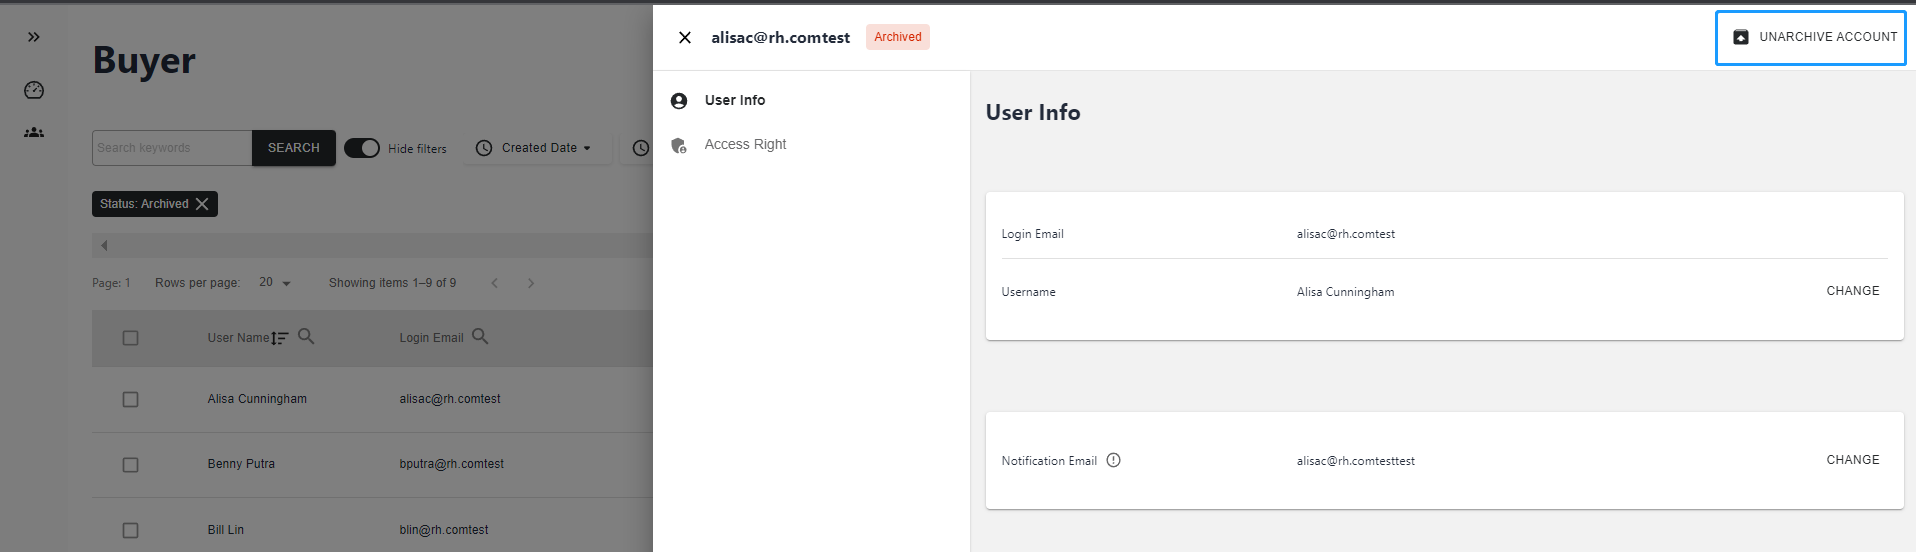 💡Notes:
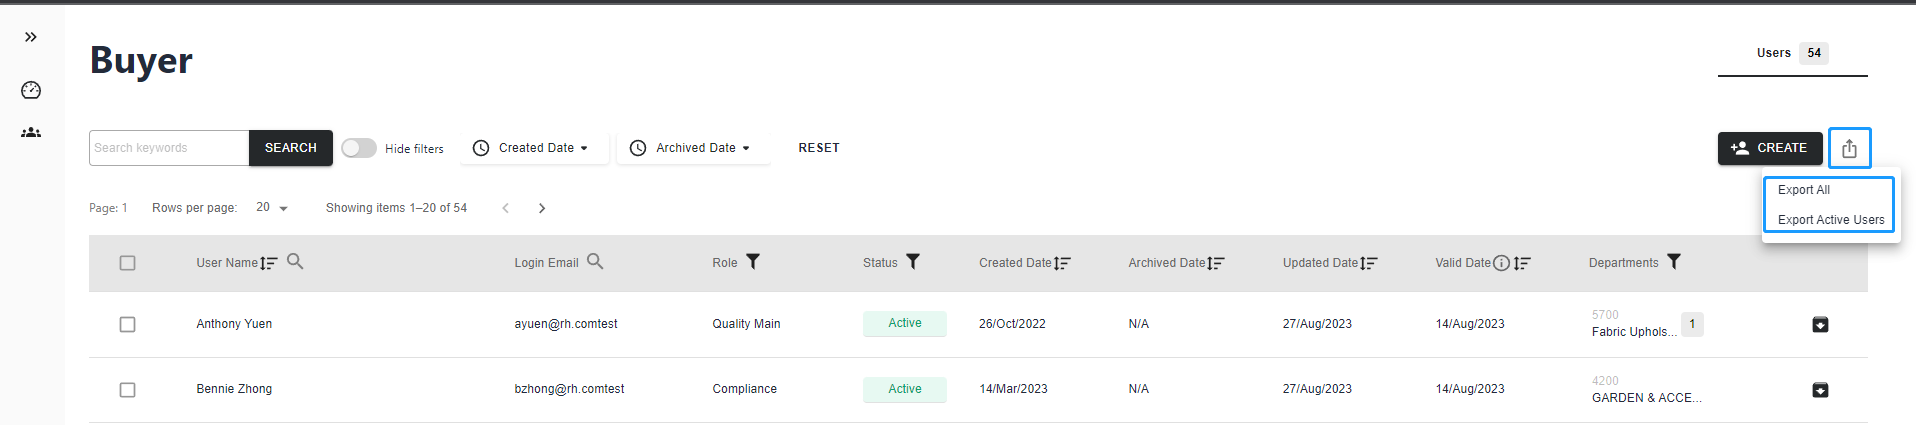
 💡Notes:
 💡Notes:

 💡Notes:
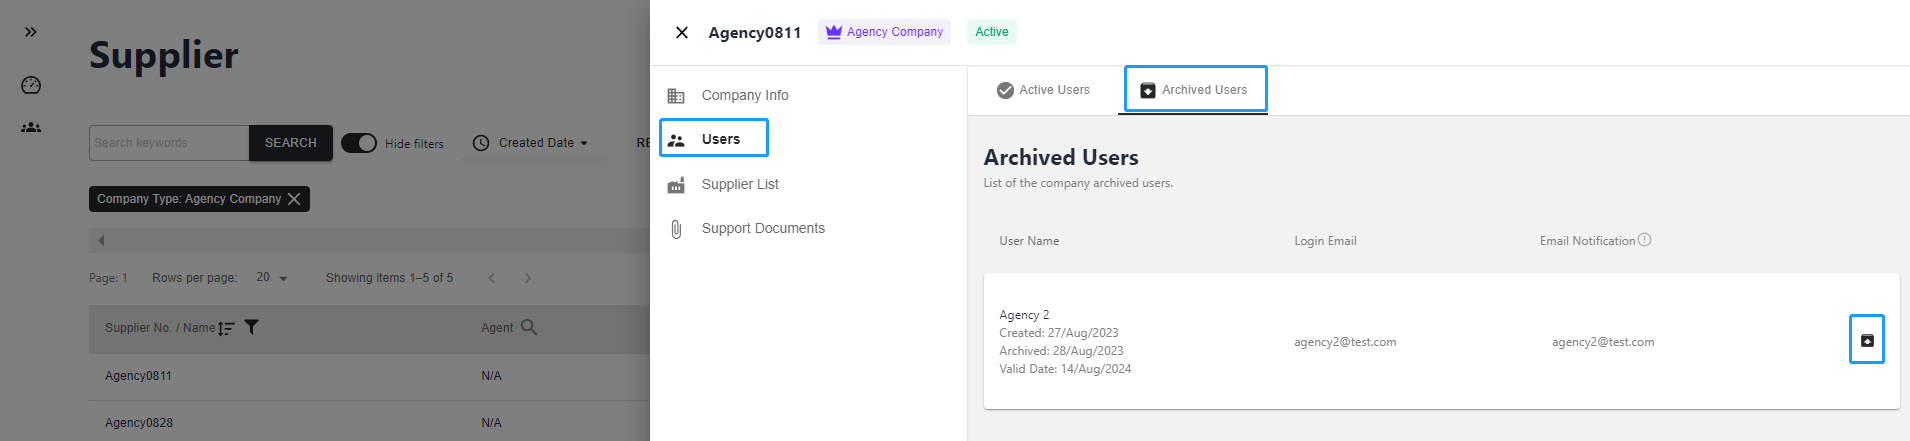 💡Notes:
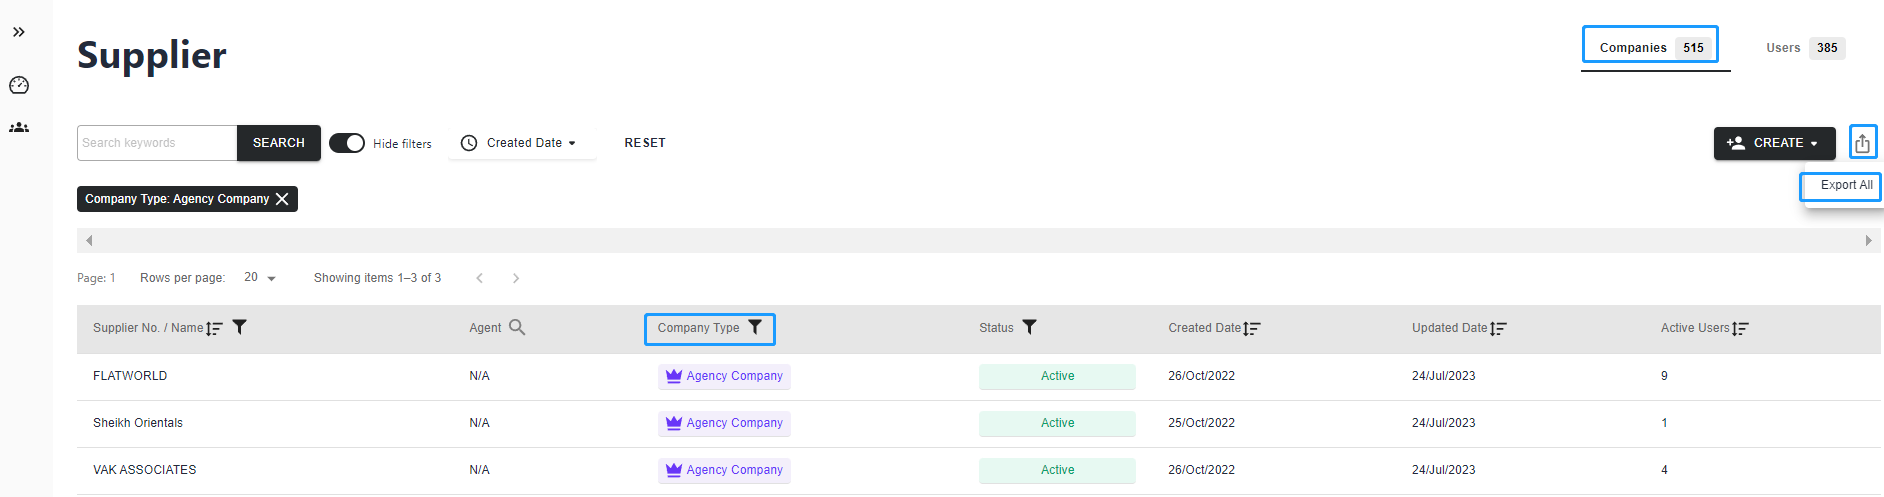
 💡Notes:
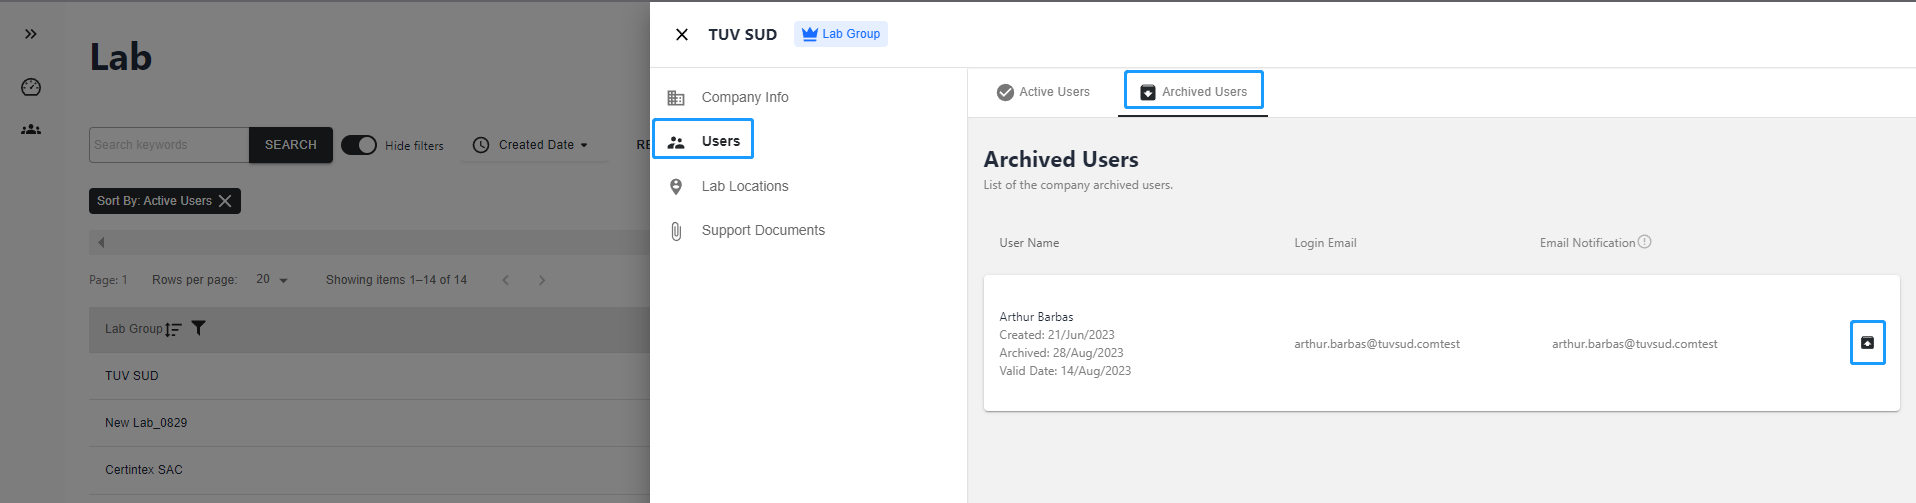
 💡
💡
 💡
💡 💡Notes:
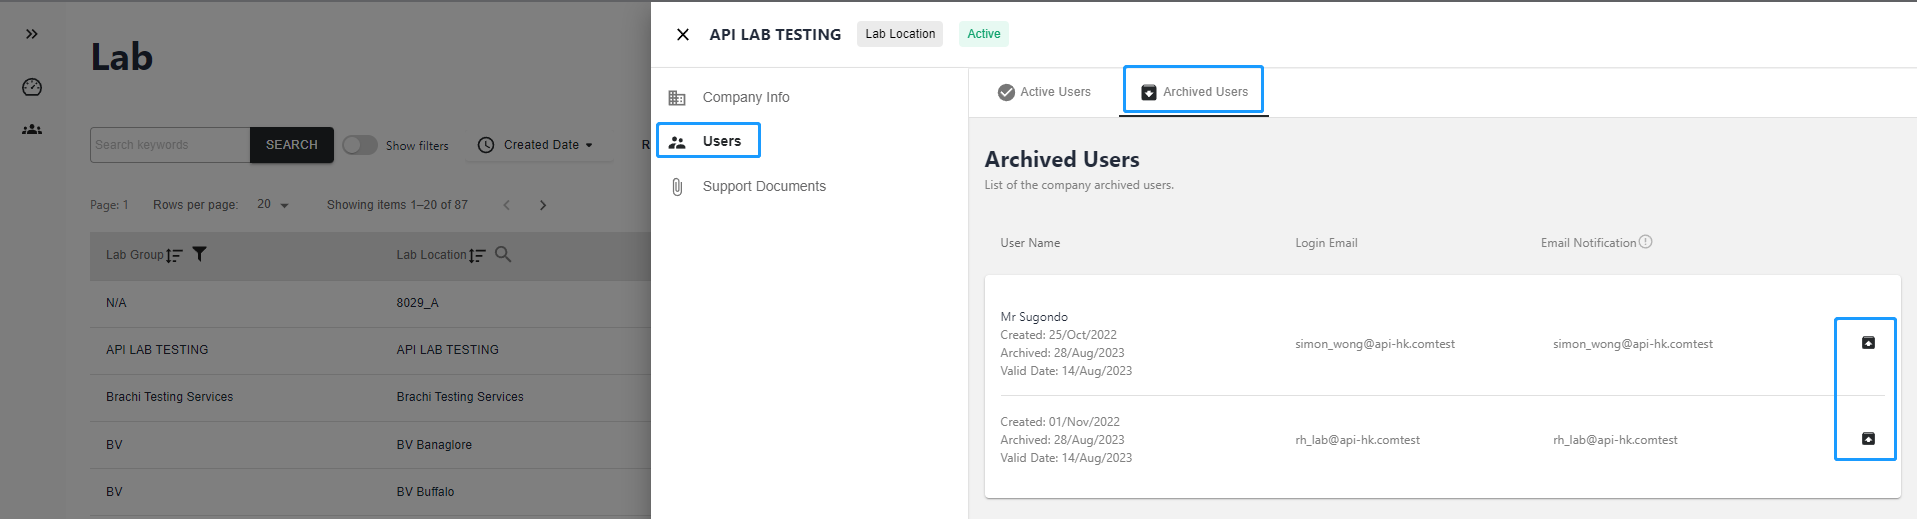 💡
💡

 📽️Video Tutorial


.png)
.png)